GEM Plugin Integration Quick Start
Requirements
The GEM Plugin for Unreal was designed to be fairly modular and drop-in, but does have some requirements for how an Experience is put together.
- The GEM Plugin has been written for Unreal Engine 5.4. It may work with later versions, but has not been tested with them. It will not work with 5.3 or earlier.
- Since the GEM Plugin requires a fair amount of data be persistent throughout the entire experience, an experience should be designed to use a single persistent level with streaming levels.
- Some safety functions in an LBE environment require using the headset's passthrough functionality. Please be sure to set passthrough permissions in the plugins for whichever headset your experience is being created for.
- In order to work correctly with GEM, the GameSession and GameInstance classes of the experience should inherit from the GEMGameSession and GEMGameInstance classes, respectively.
- The Client Startup Level utilizes some functions from the free, open-source AdvancedSessions Plugin. Please be sure to include the AdvancedSessions plugin in your project. You can get it from the author's GitHub. It has also been included in our GEM Plugin repository.
Getting Started
- Download the GEM Plugin from the GEM Plugin Repository and add it to the Plugins folder of your project.
- If you are using the Unreal Engine built from source, re-generate your solution and recompile your project.
- Open your project.
-
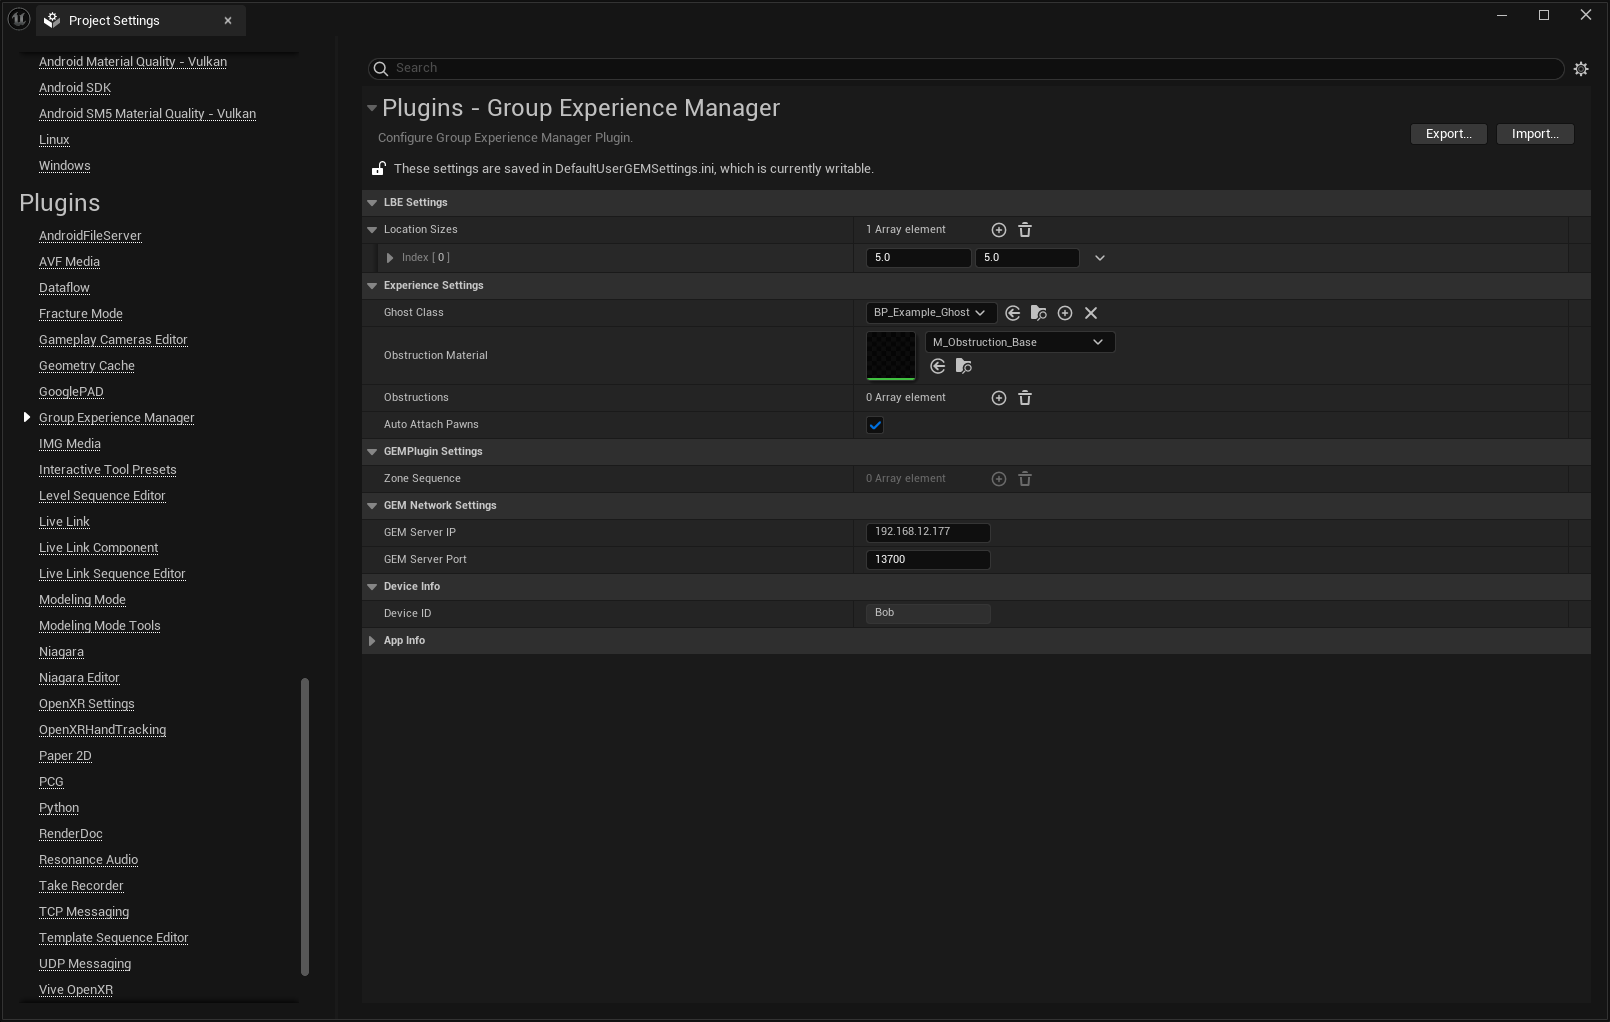
Go to Project Settings -> Plugins -> Group Experience Manager
-
Under LBE Settings, hit the + button next to Location Sizes to add a new Location Size entry, and set it to your desired stage size. (NOTE: Unreal uses an X-Forward coordinate system, and our expectation is that stages will be calibrated with the forward direction looking down the long-axis of the stage, so the larger dimension of a Location Size should be X).
-
Under Experience Settings, select a Ghost Class. An example Ghost Class is included with the Plugin (shown already selected in the screenshot above), but you will probably want to create a Ghost whose art style more closely matches that of your experience. The only requirements for a Ghost are that they be a replicated Actor class.
-
Under Experience Settings, select an Obstruction Material. An example Obstruction material is included with the plugin.
-
Under Maps & Modes, set the Game Default Map to Client_Startup_Level (included with the Plugin), and the Server Default Map to your experience's Persistent Level. Set the GameInstance class to the GEMGameInstance. If you already have a custom Game Instance Blueprint class, edit it and reparent it to the GEMGameInstance. If you have a custom native Game Instance class, you will have to change its inheritance in your source code.
-
In your GameMode, set the GameSession to the GEMGameSession. If you already have a custom GameSession, edit it and reparent it to the GEMGameSession.
-
In your GameState, add the ExperienceManagerComponent. If you don't have a custom GameState Blueprint, create one. The ExperienceManagerComponent can also be added to a native GameState class, but most of the variables for the ExperienceManagerComponent are best edited in Blueprint, so even if using a custom native GameState it is best to have a Blueprint sub-class of that GameState.
-
In your PlayerController, add the ClientExperienceComponent. If you don't have a custom PlayerController Blueprint, create one. You can also add the ClientExperienceComponent to a native PlayerController class. There are no accessible variables in the ClientExperienceComponent, but there are some events that are easier to work with in Blueprint than natively, so a Blueprint sub-class of your PlayerController is recommended.
-
Edit your DefaultGame.ini and add the following line to the
[Internationalization]section (if you don't have an[Internationalizaton]section, add it):+LocalizationPaths=%GAMEDIR%/Plugins/WevrGEMLBEPlugin/Content/Localization/GEMLoc
Activating the GEM Online Subsystem
The GEM Plugin utilizes a custom Online Subsystem in order to make conversion of multiplayer games and experiences to GEM as easy as possible.
To activate it, simply add the following lines to your projects DefaultEngine.ini:
[OnlineSubsystem]
DefaultPlatformService=GEM
For testing without GEM, set the DefaultPlatformService to Null, and any functions in the GEM Plugin that would normally require making a call to the GEM Server (i.e. querying if a Stage Zone is free for the group to move into) will return True. However, when testing with the DefaultPlatormService as anything other then GEM, it is necessary to pass -GemGroupId=[Any Number] and -GemGroupSize=[However many players you're testing with] as command line parameters when launching the game server.
Tutorial
-
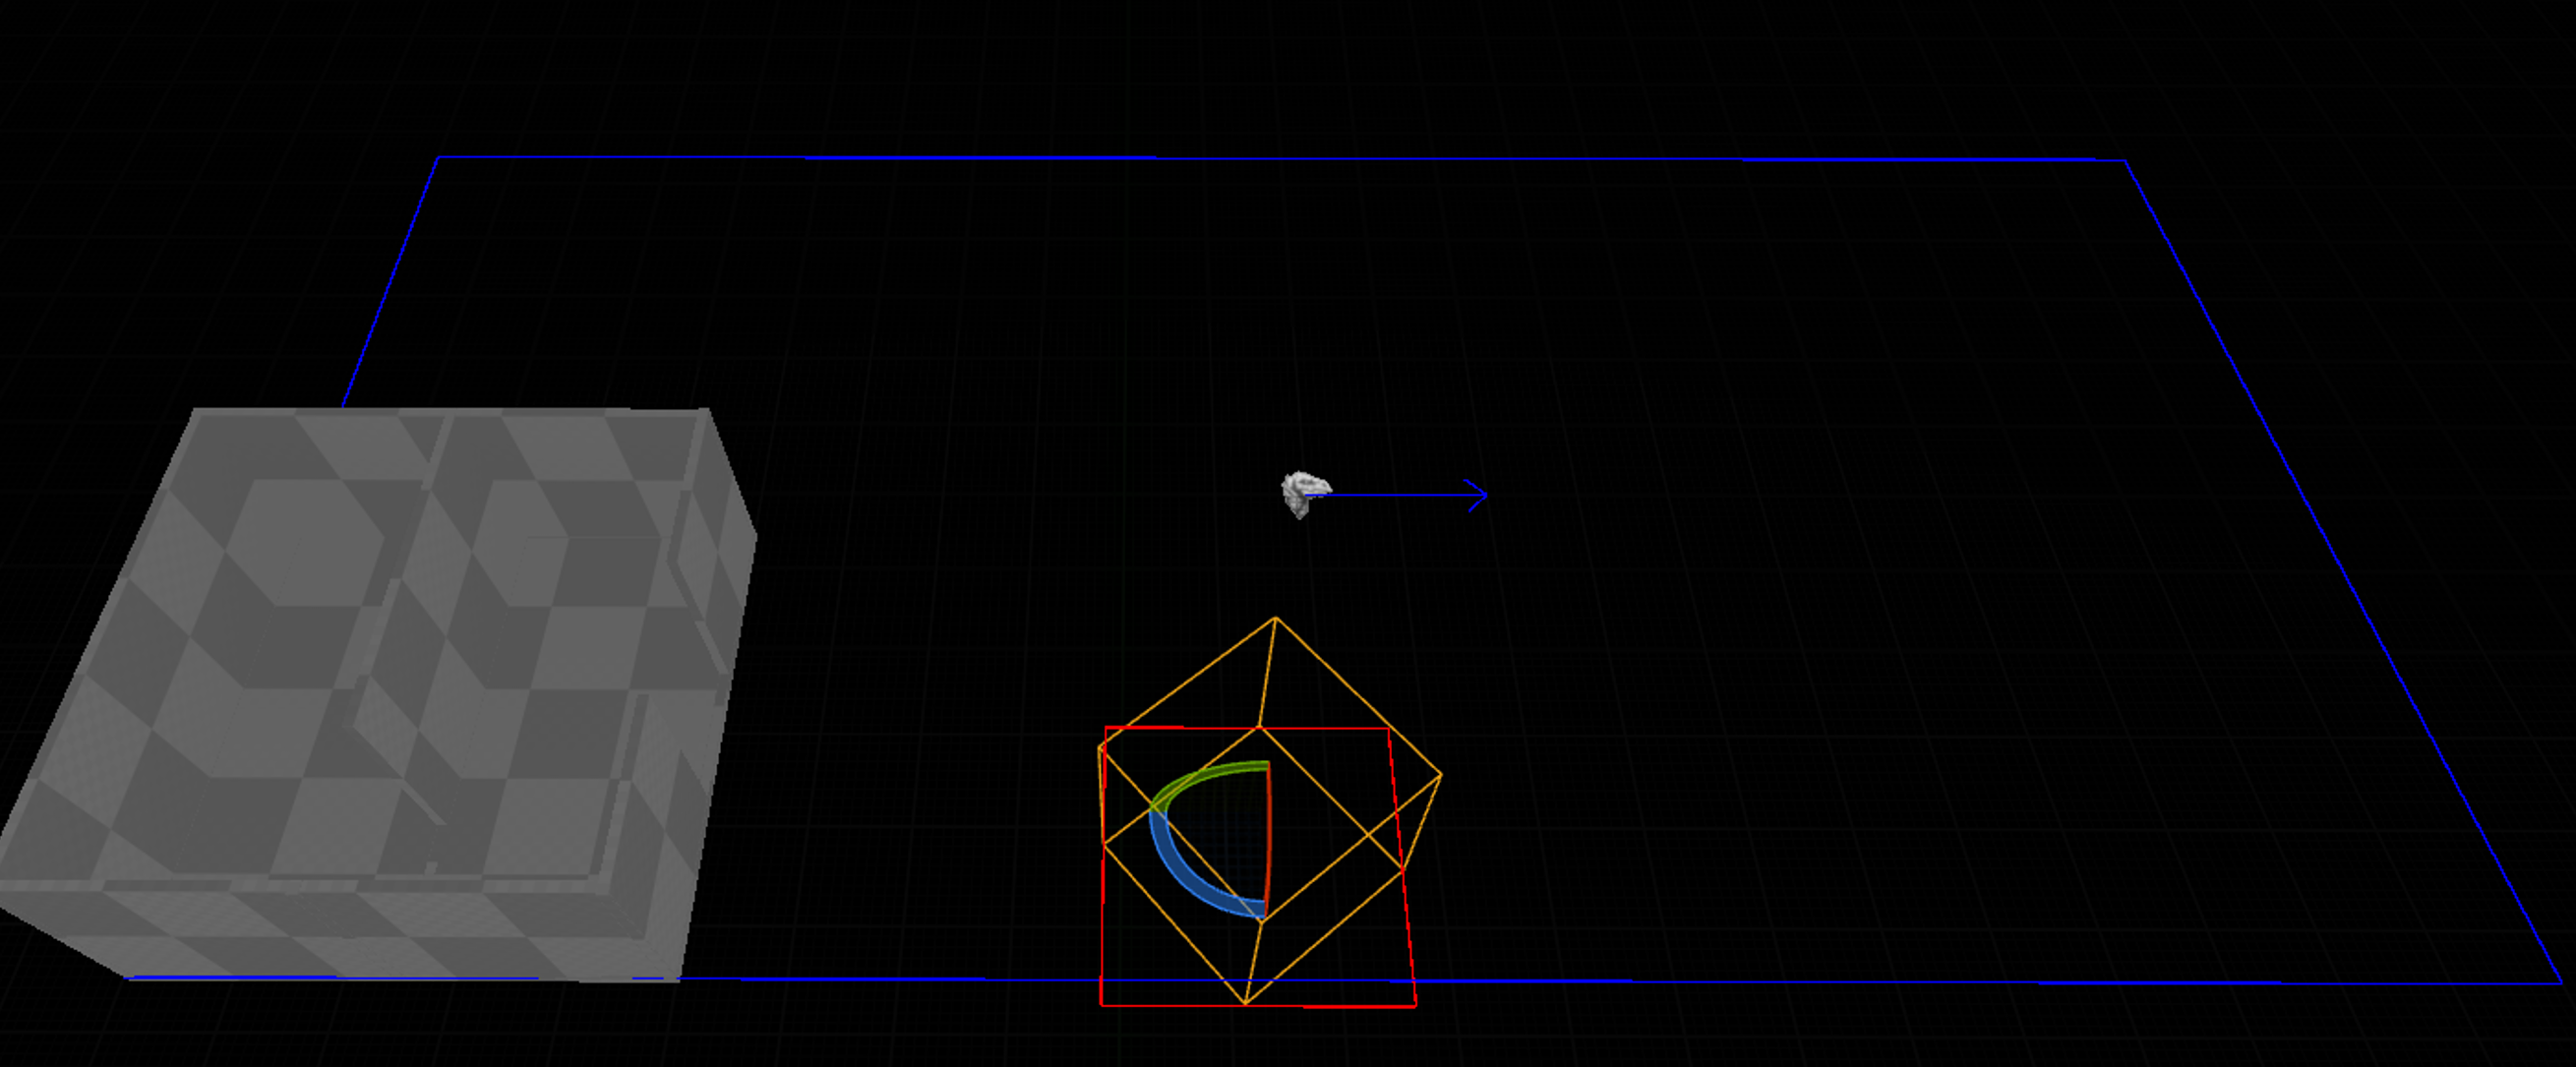
Add a Tracking Origin actor to your Persistent Level (or to an always loaded sub-level of your experience). You should see something that looks like this:
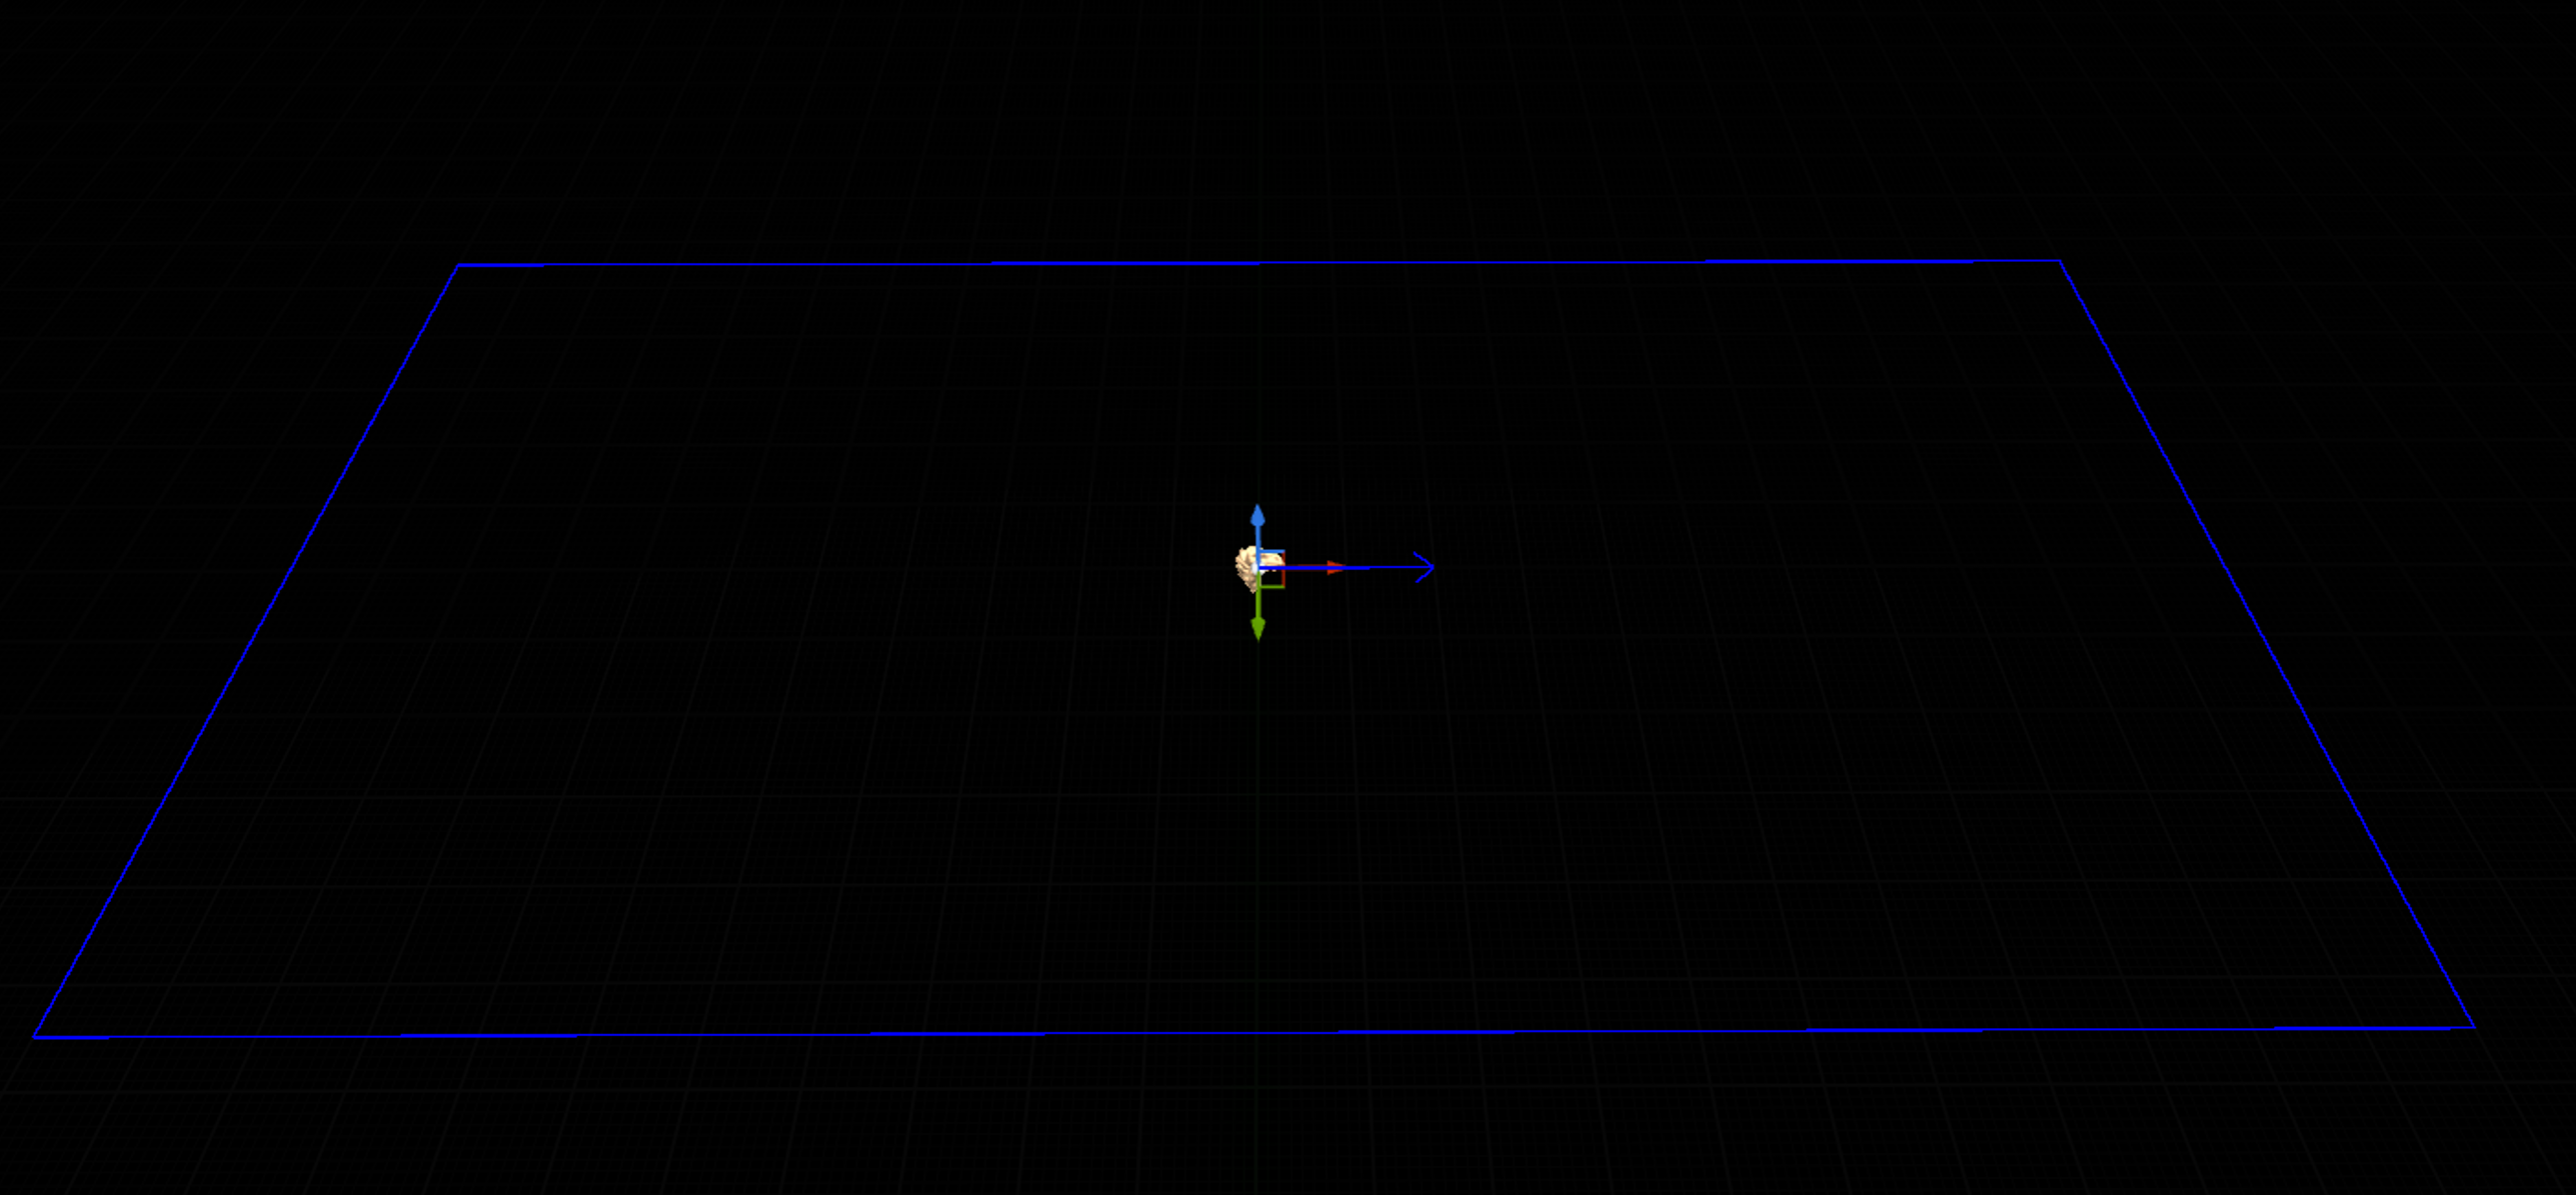
The blue outline is the debug visualization of the stage, and represents the bounds of the stage. The blue arrow is the forward direction of the stage.
-
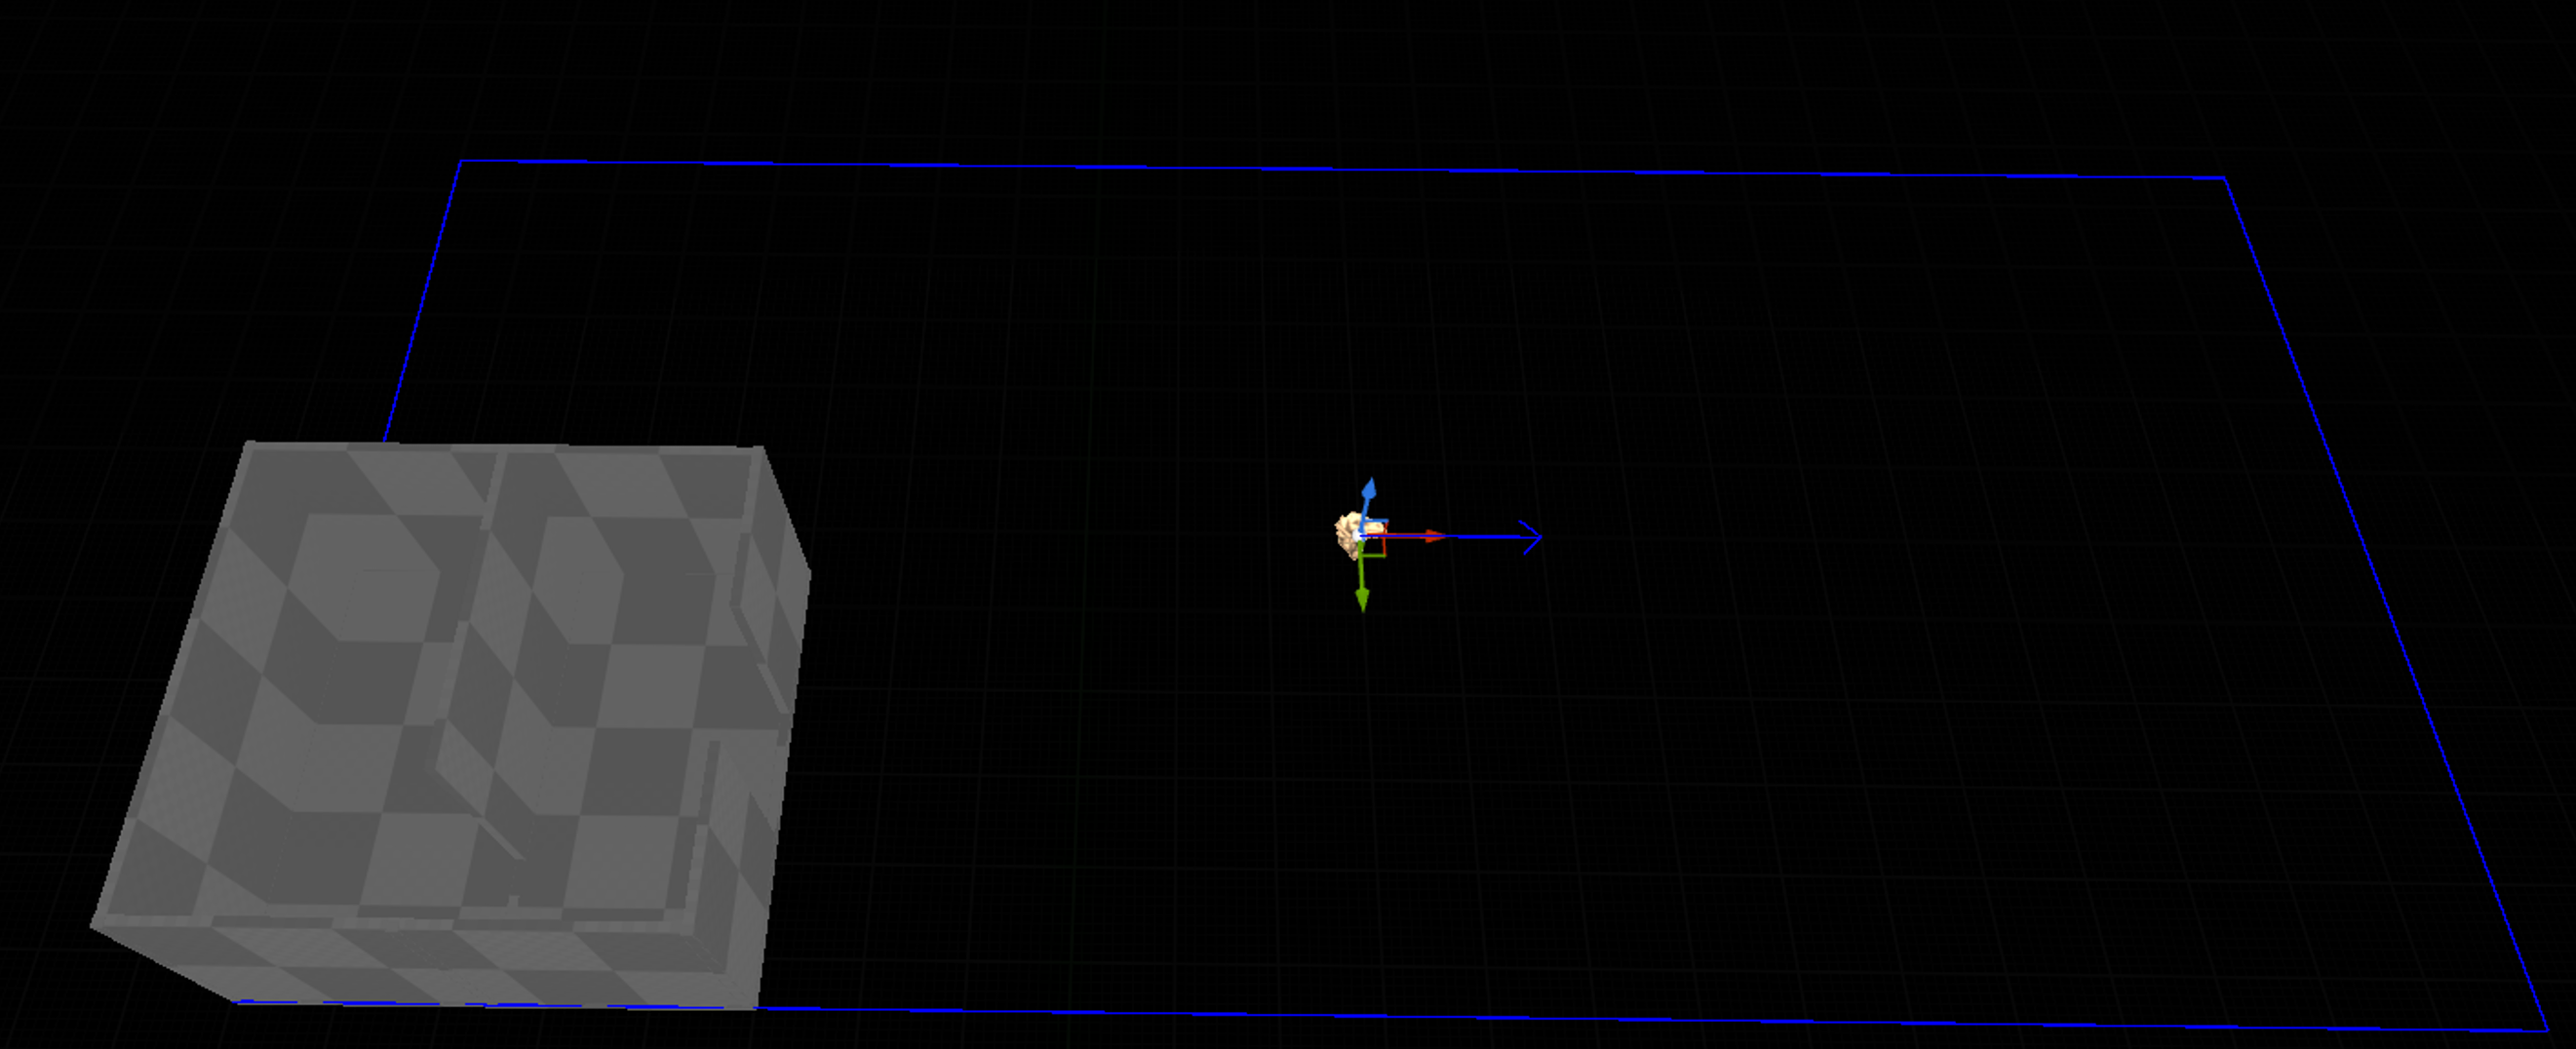
Align the tracking origin so that the first area of your experience matches the location on the stage where you expect it to be.
 {width="886" height="361"}
In this example I have a large divided room with an exit, and I want this part of the experience to be in this back corner of the stage.
-
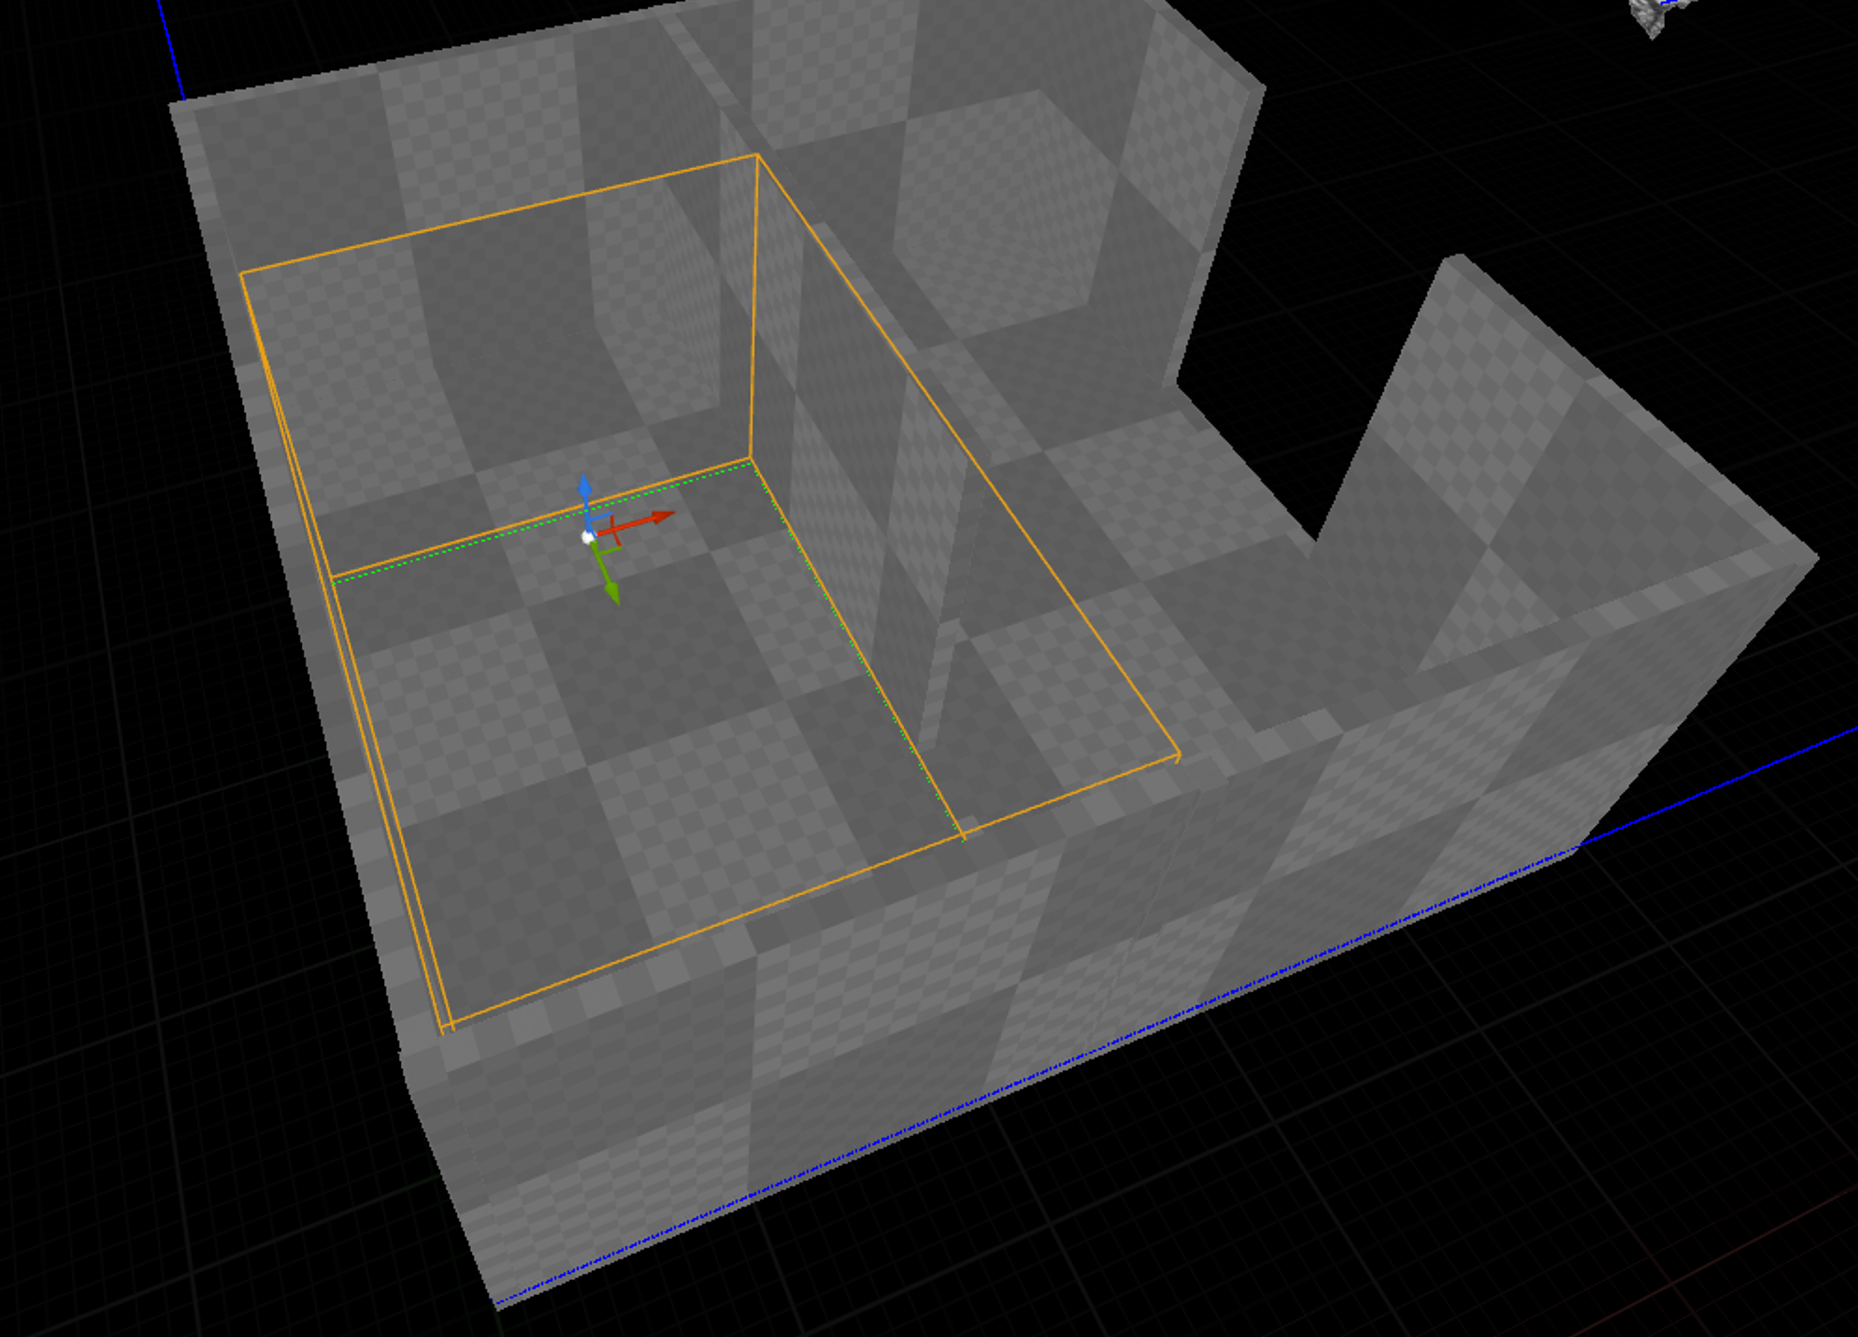
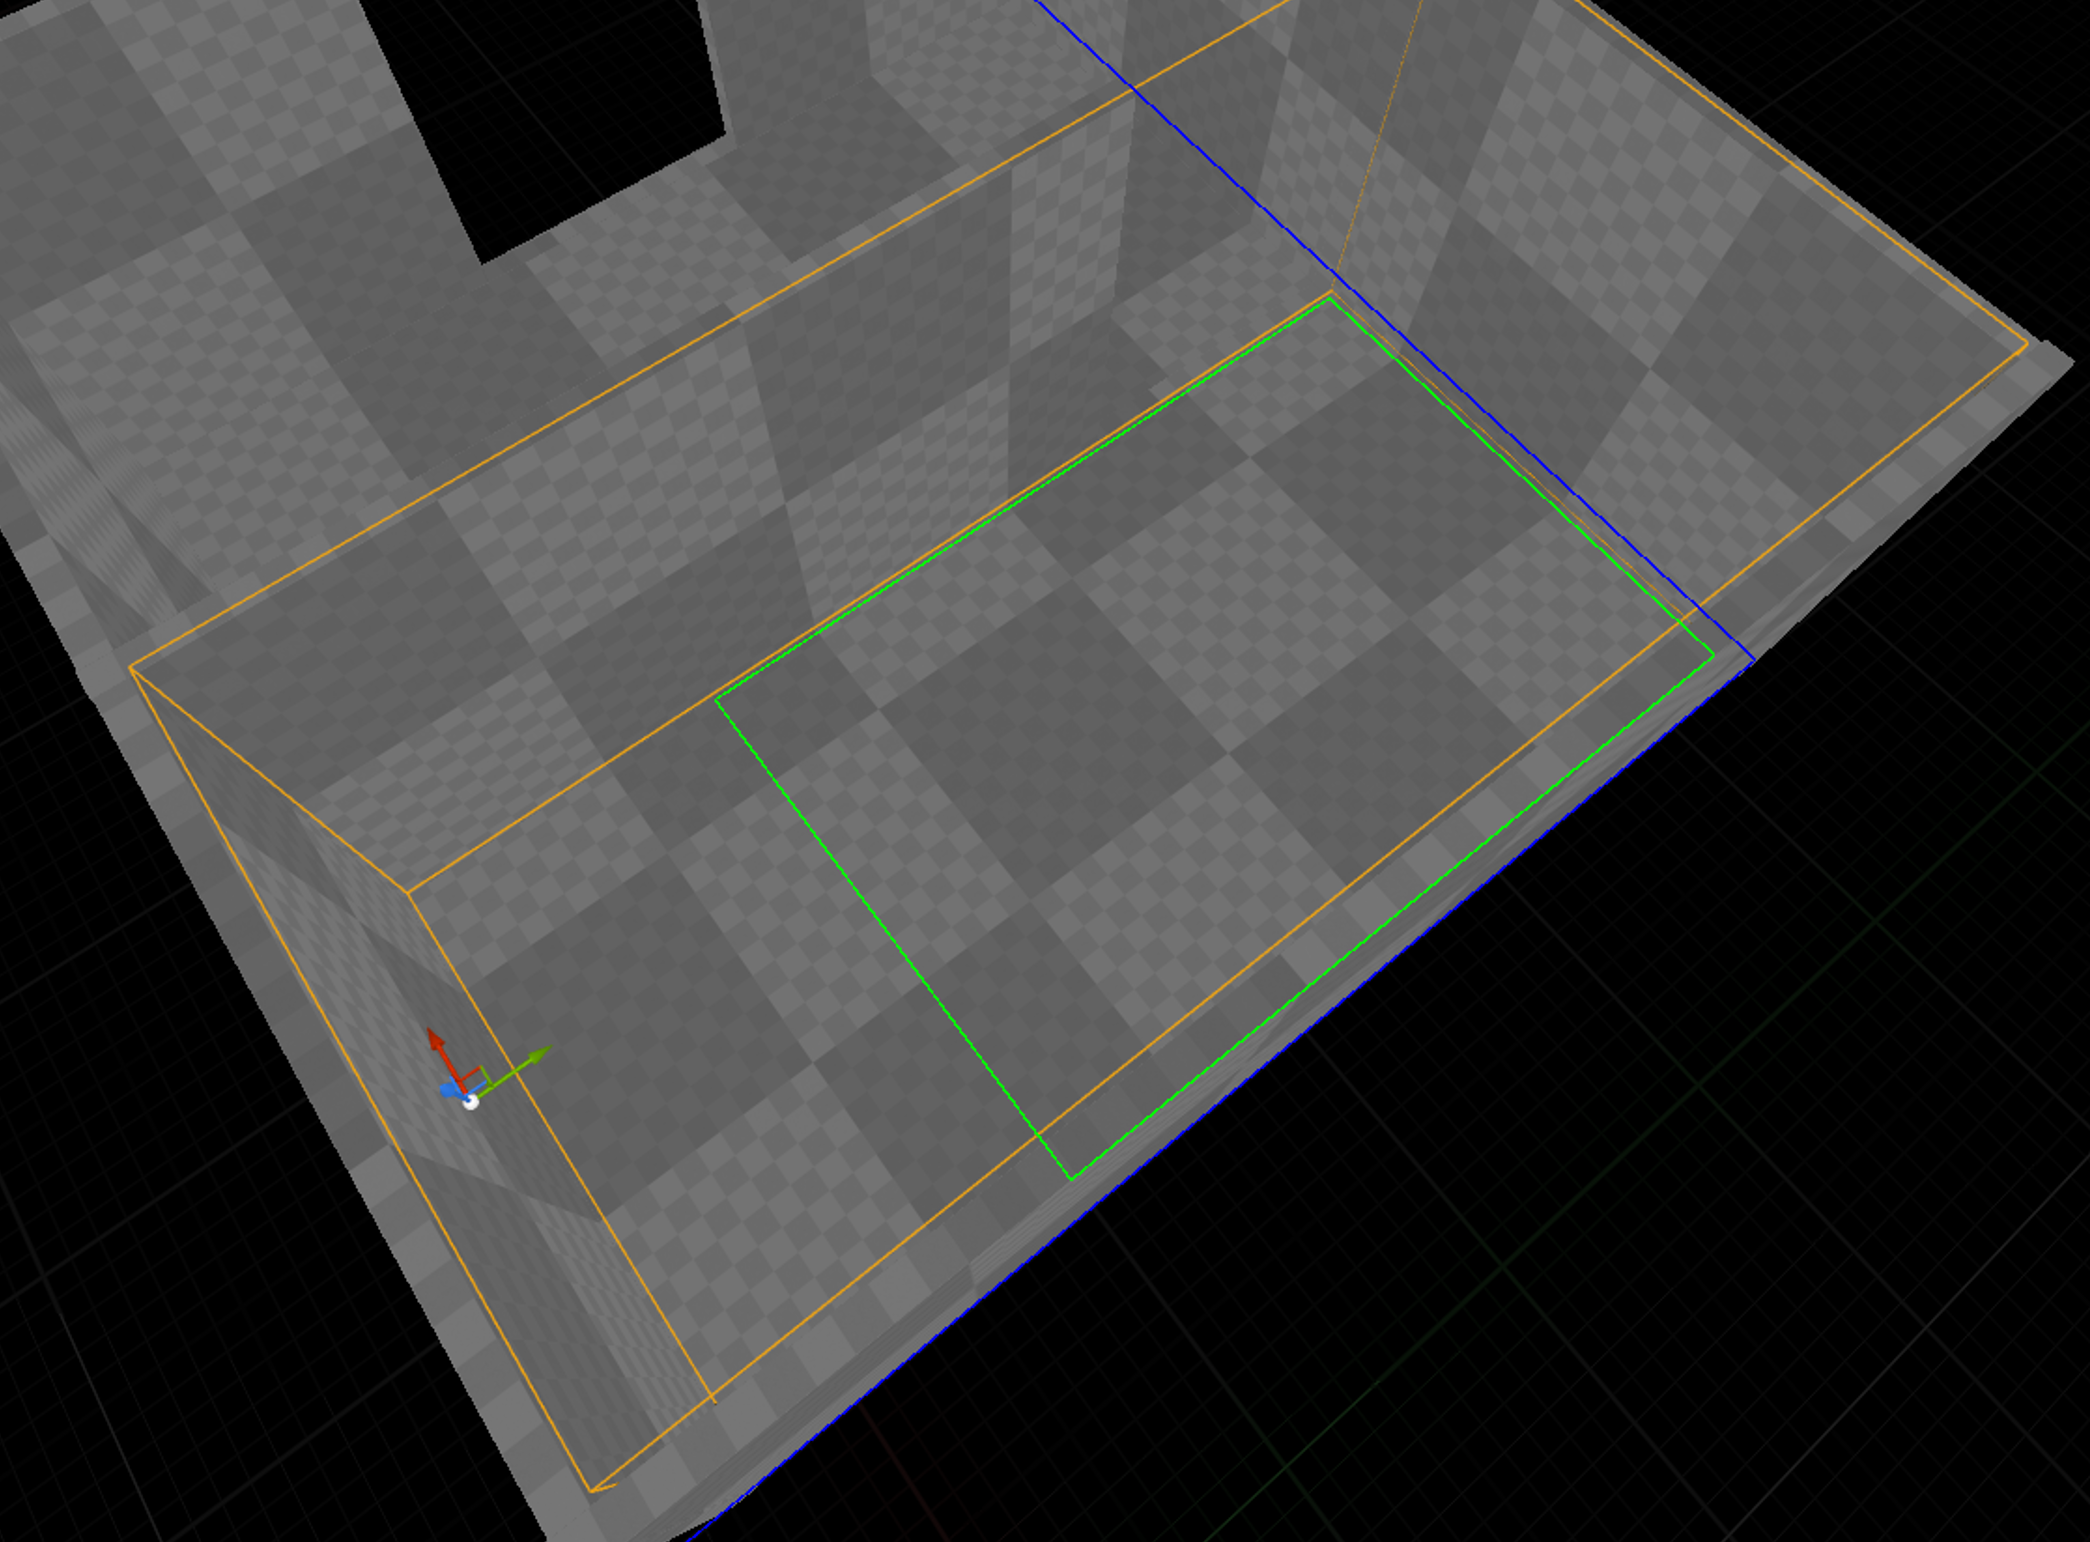
Now to define the first Stage Zone. Add a Zone Boundary Volume to the world, and attach it to the tracking origin. Set the Stage Zone Index of the Zone Boundary Volume to 0. You should see a green box in the stage debug visualization, like so:
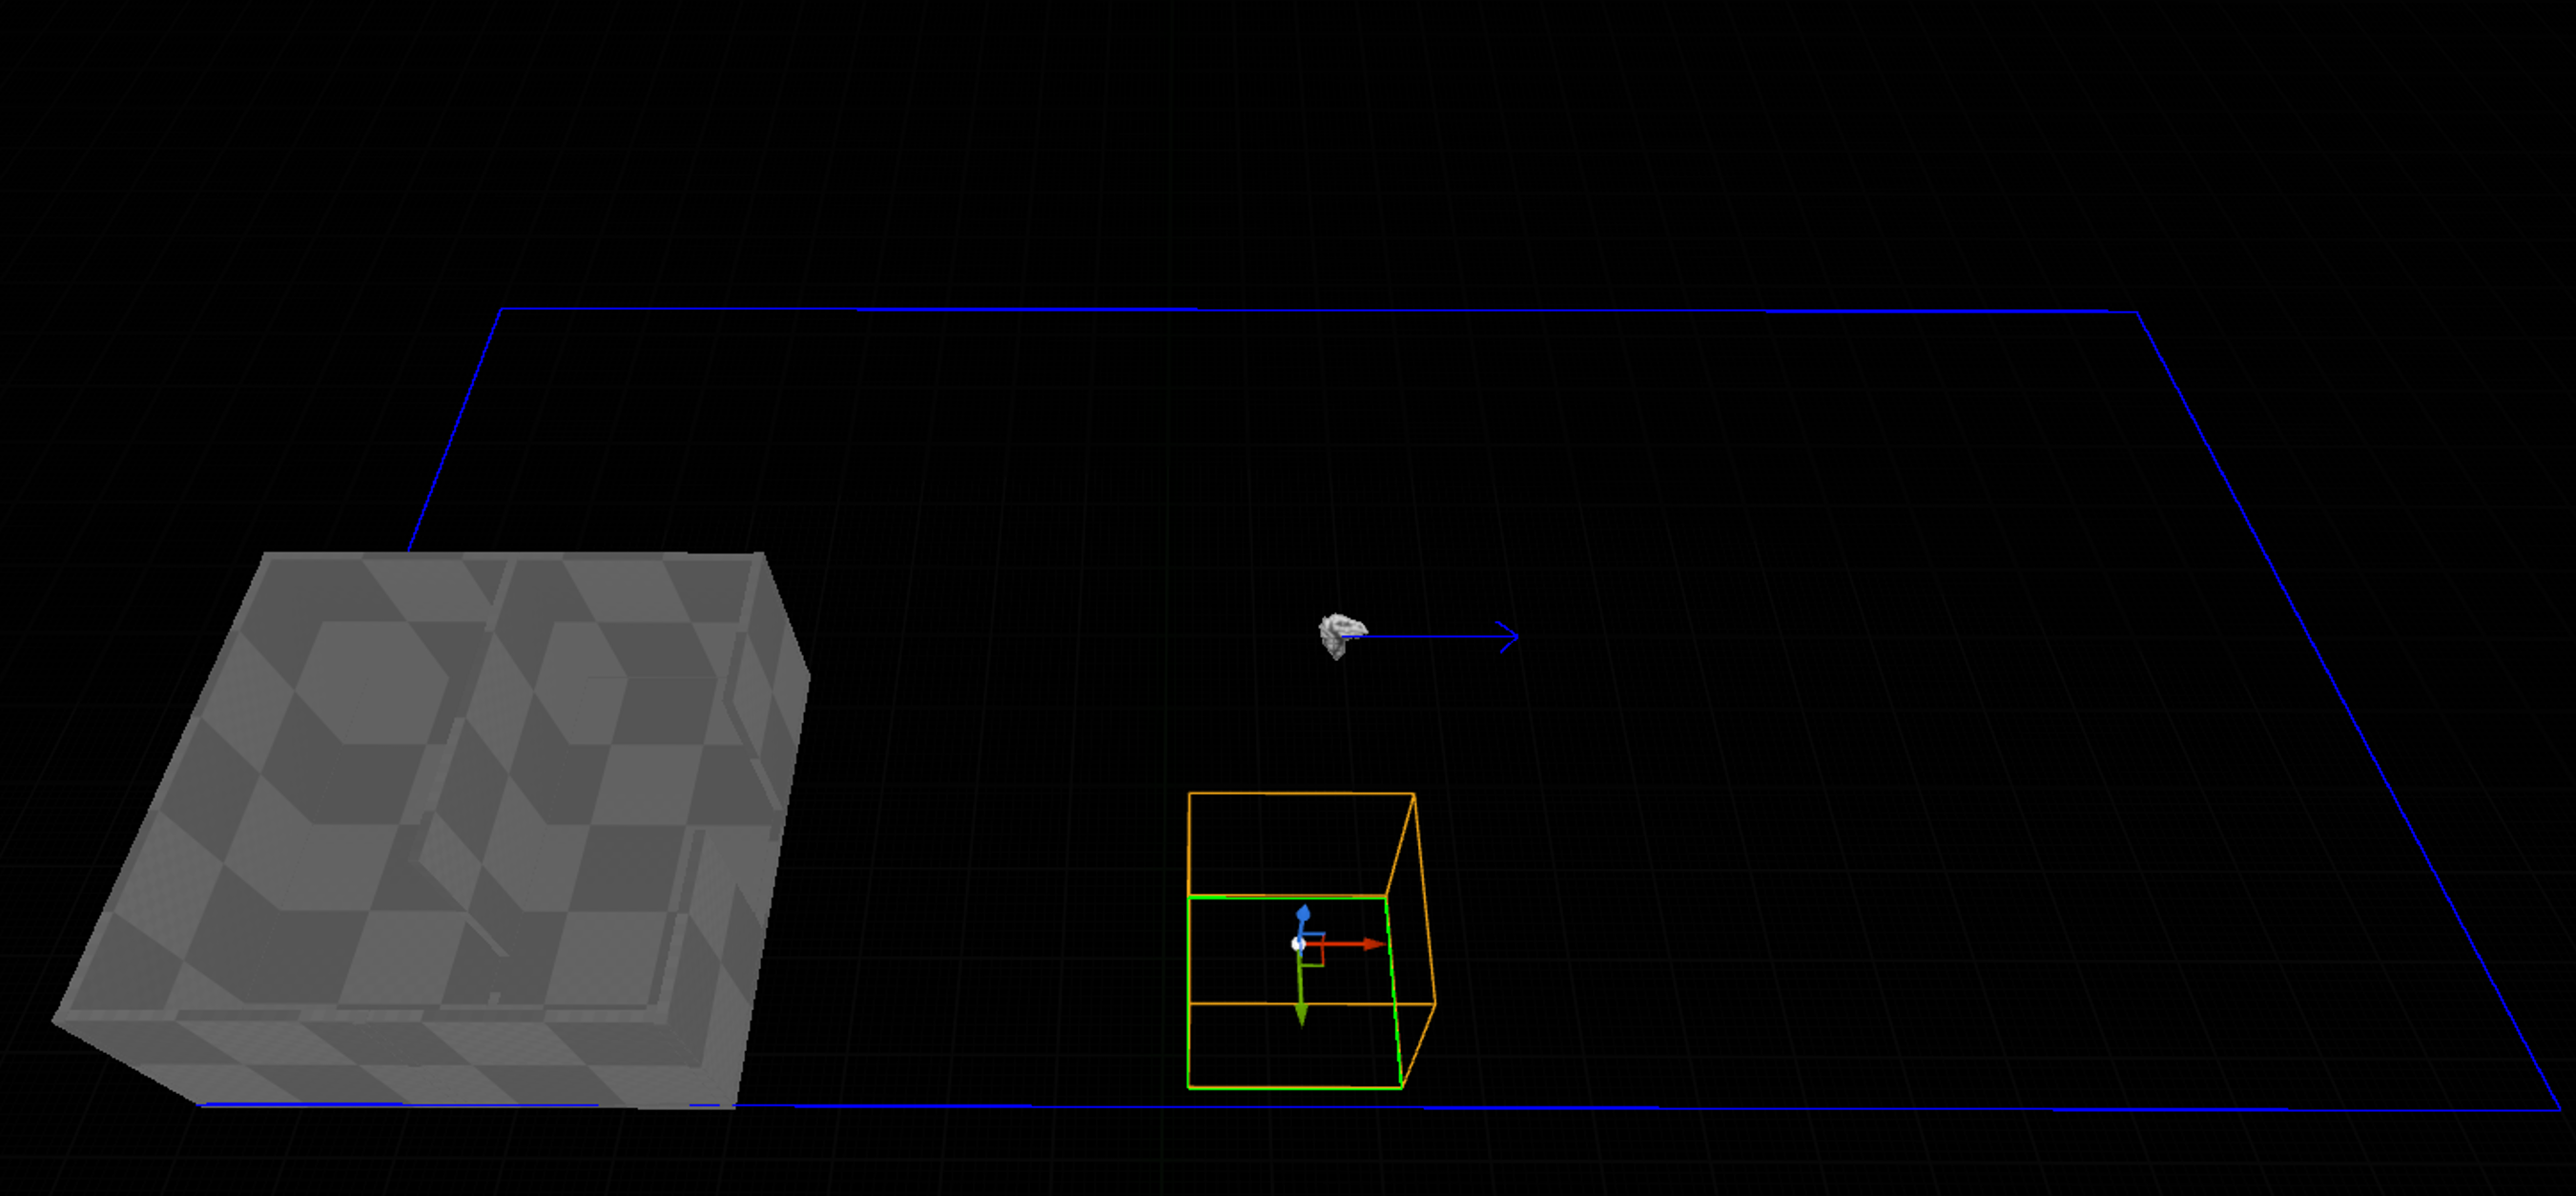
This is the boundary of Stage Zone 0. If you rotate the Zone Boundary Volume, you will see the green box change size, this is because Stage Zone boundaries are always axis aligned:
If the Stage Zone boundary turns red, it is because it has exceeded the bounds of the Stage, or is overlapping another Stage Zone.
-
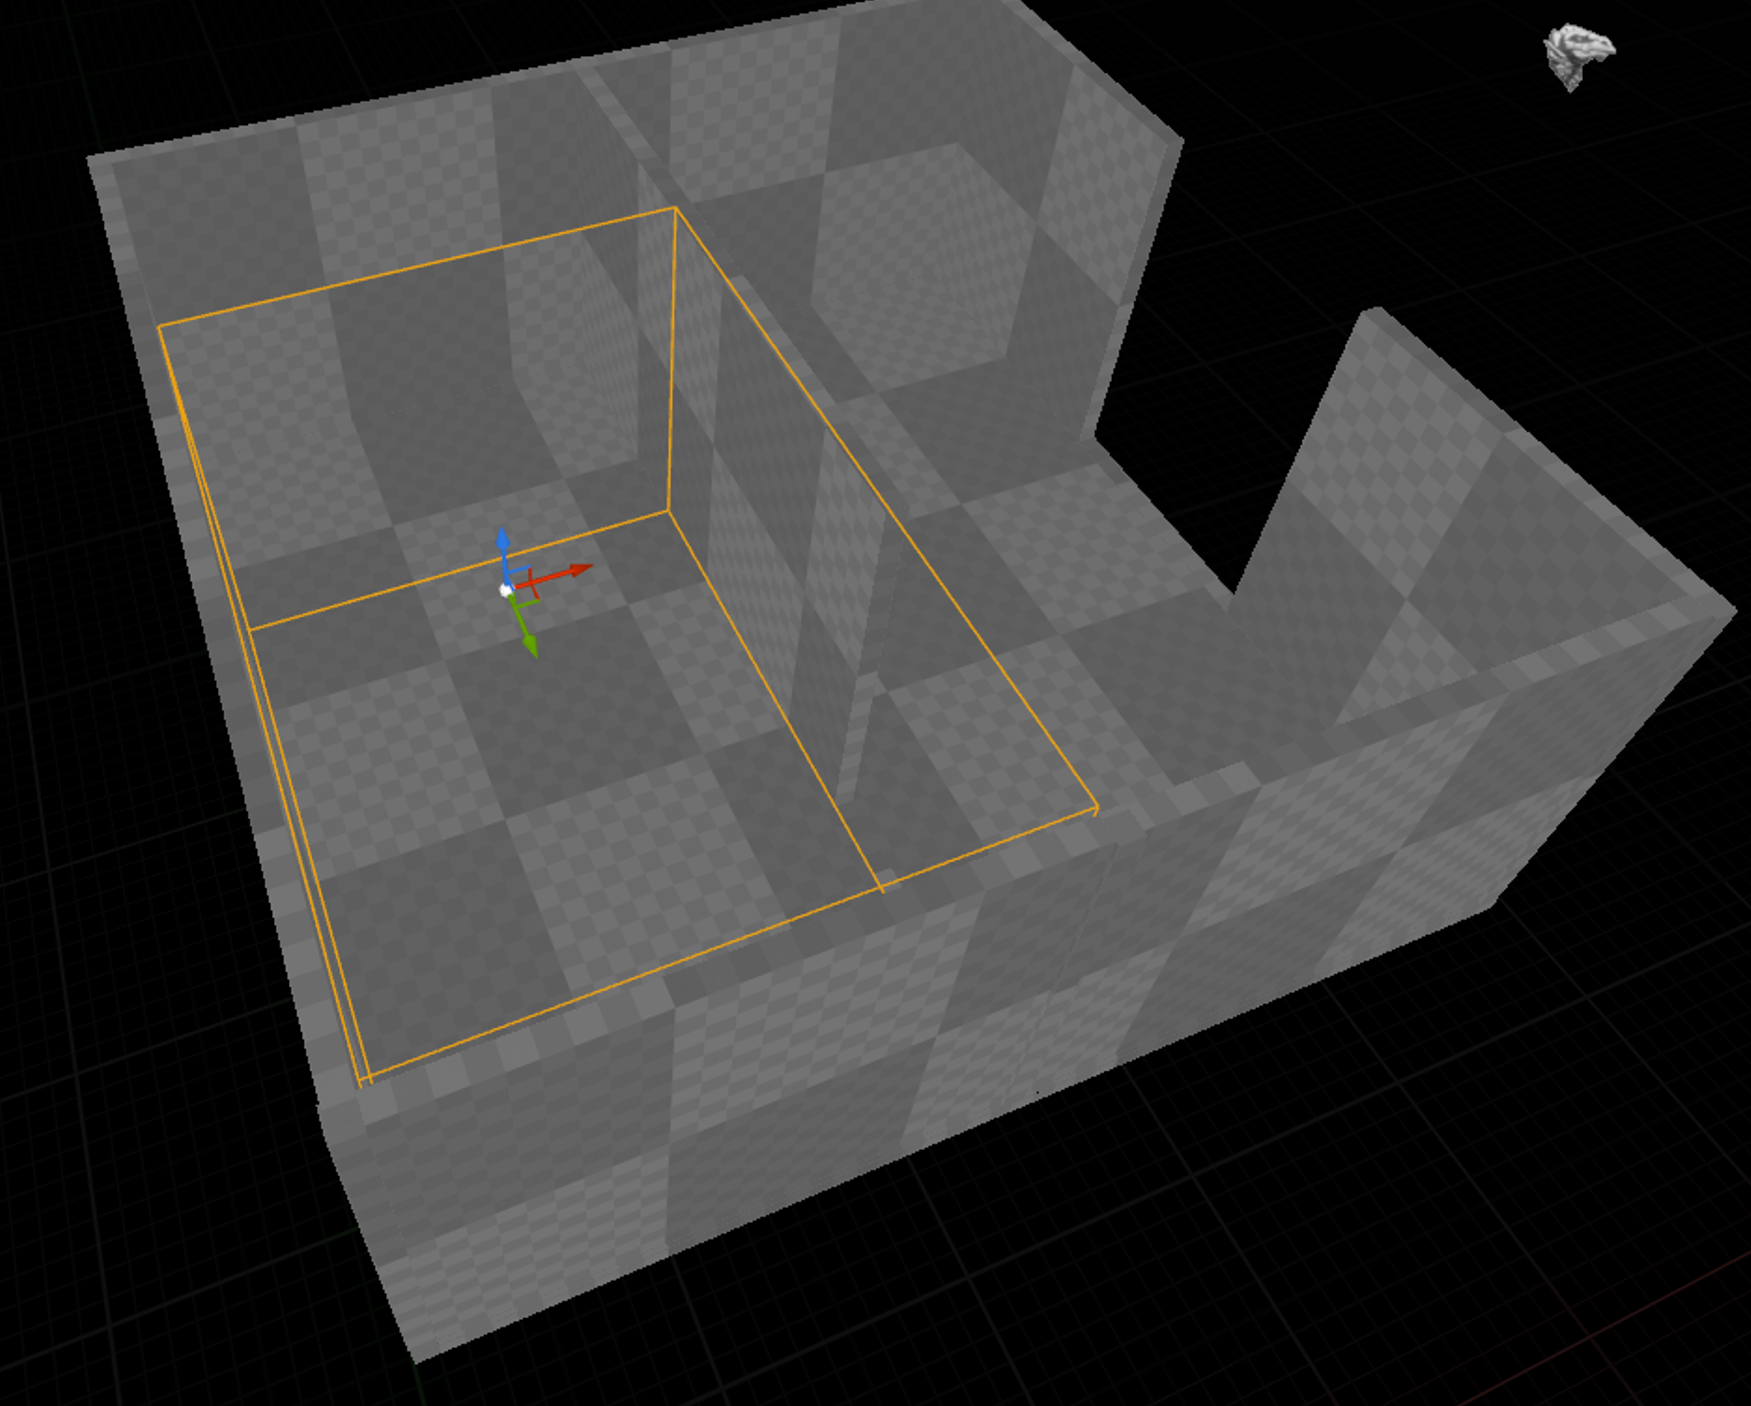
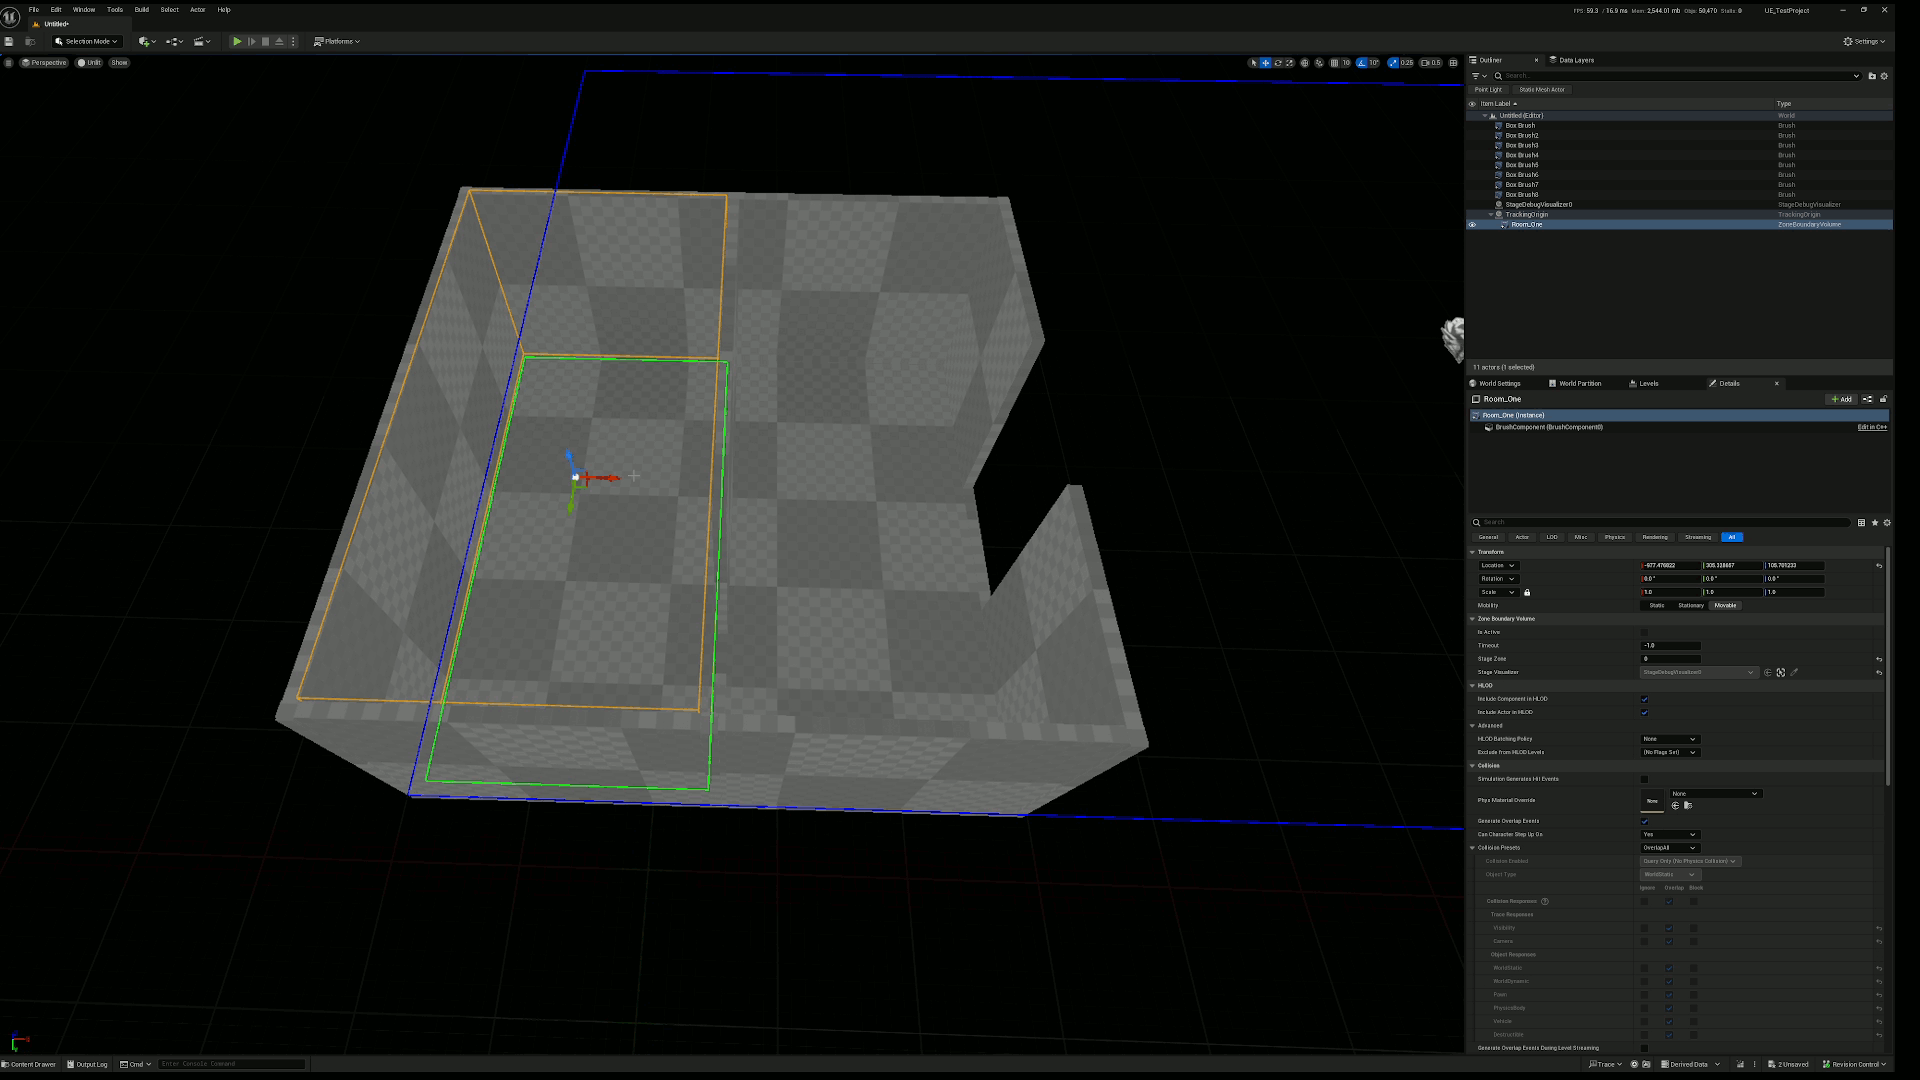
Size and shape the Zone Boundary Volume to fit the safe area of this part of your experience. For this example I am going to pretend that there is a door in the dividing wall of this first room, so I will shape this Zone Boundary Volume to fit the smaller first part of the room.
-
If you're having a hard time seeing the Stage Visualization because of your experience's geometry, you can change its sorting behaviour with the console command 'gdv.DrawOnTop'
gdv.DrawOnTop=0
gdv.DrawOnTop=1
gdv.DrawOnTop=2
-
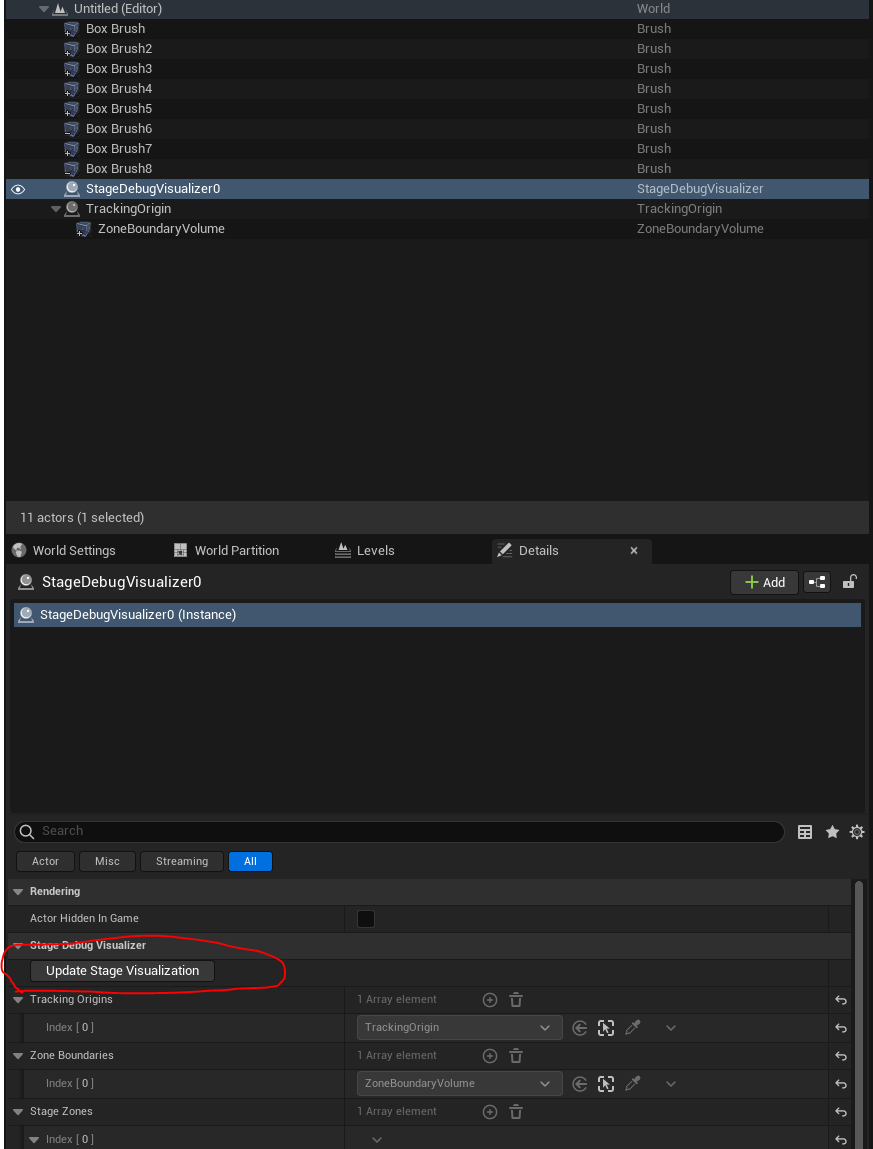
You can use the Brush Editing tools to reshape a Zone Boundary Volume however you want. However, the Stage Visualization doesn't always update immediately after using them:
You can force the visualization to update by selecting the StageDebugVisualizer actor (created automatically when the Tracking Origin was added) and clicking 'Update Stage Visualization'.
{width="372" height="489"}
-
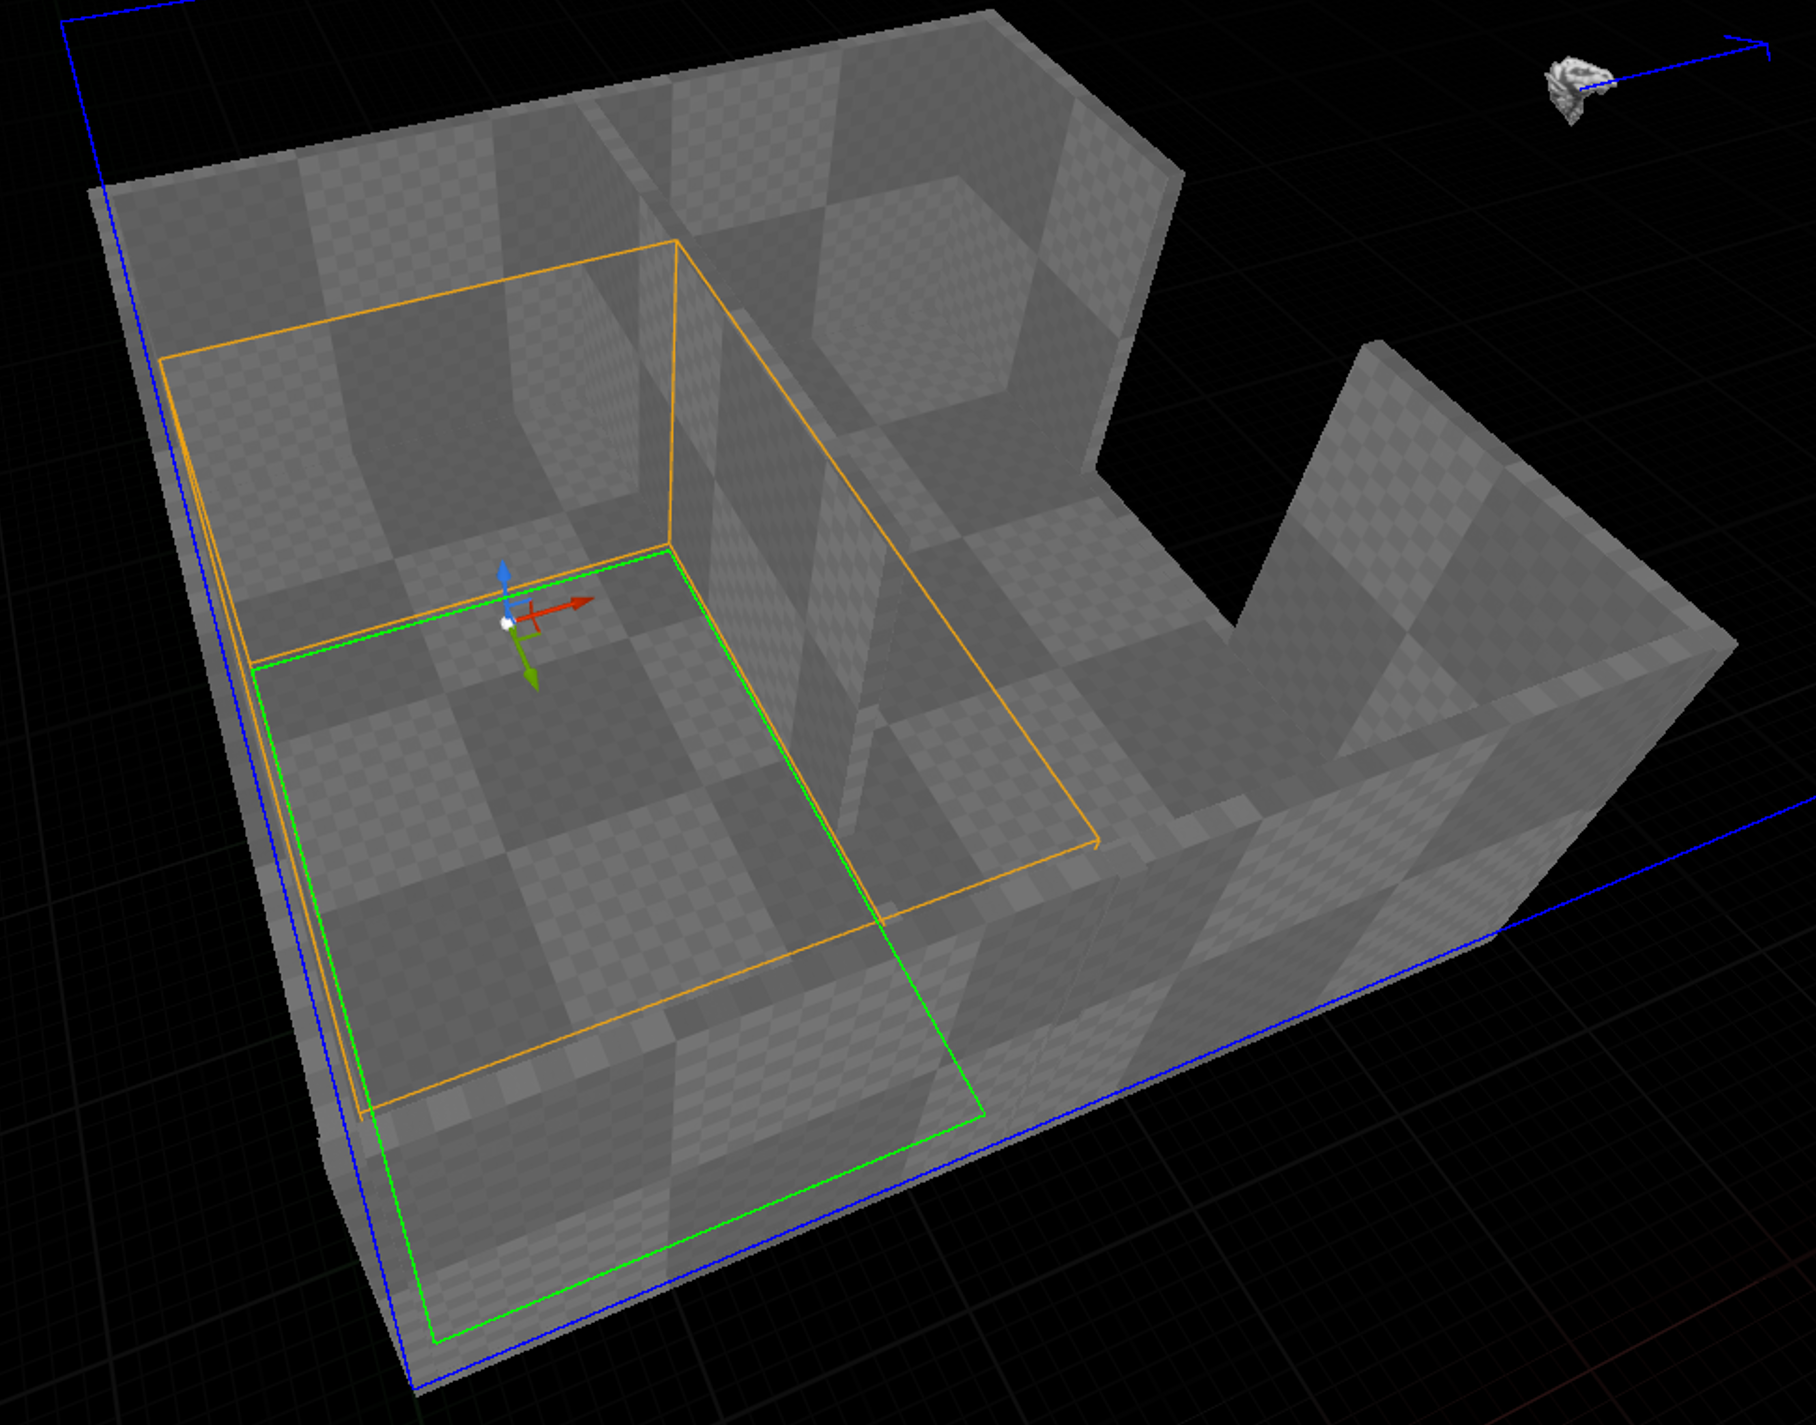
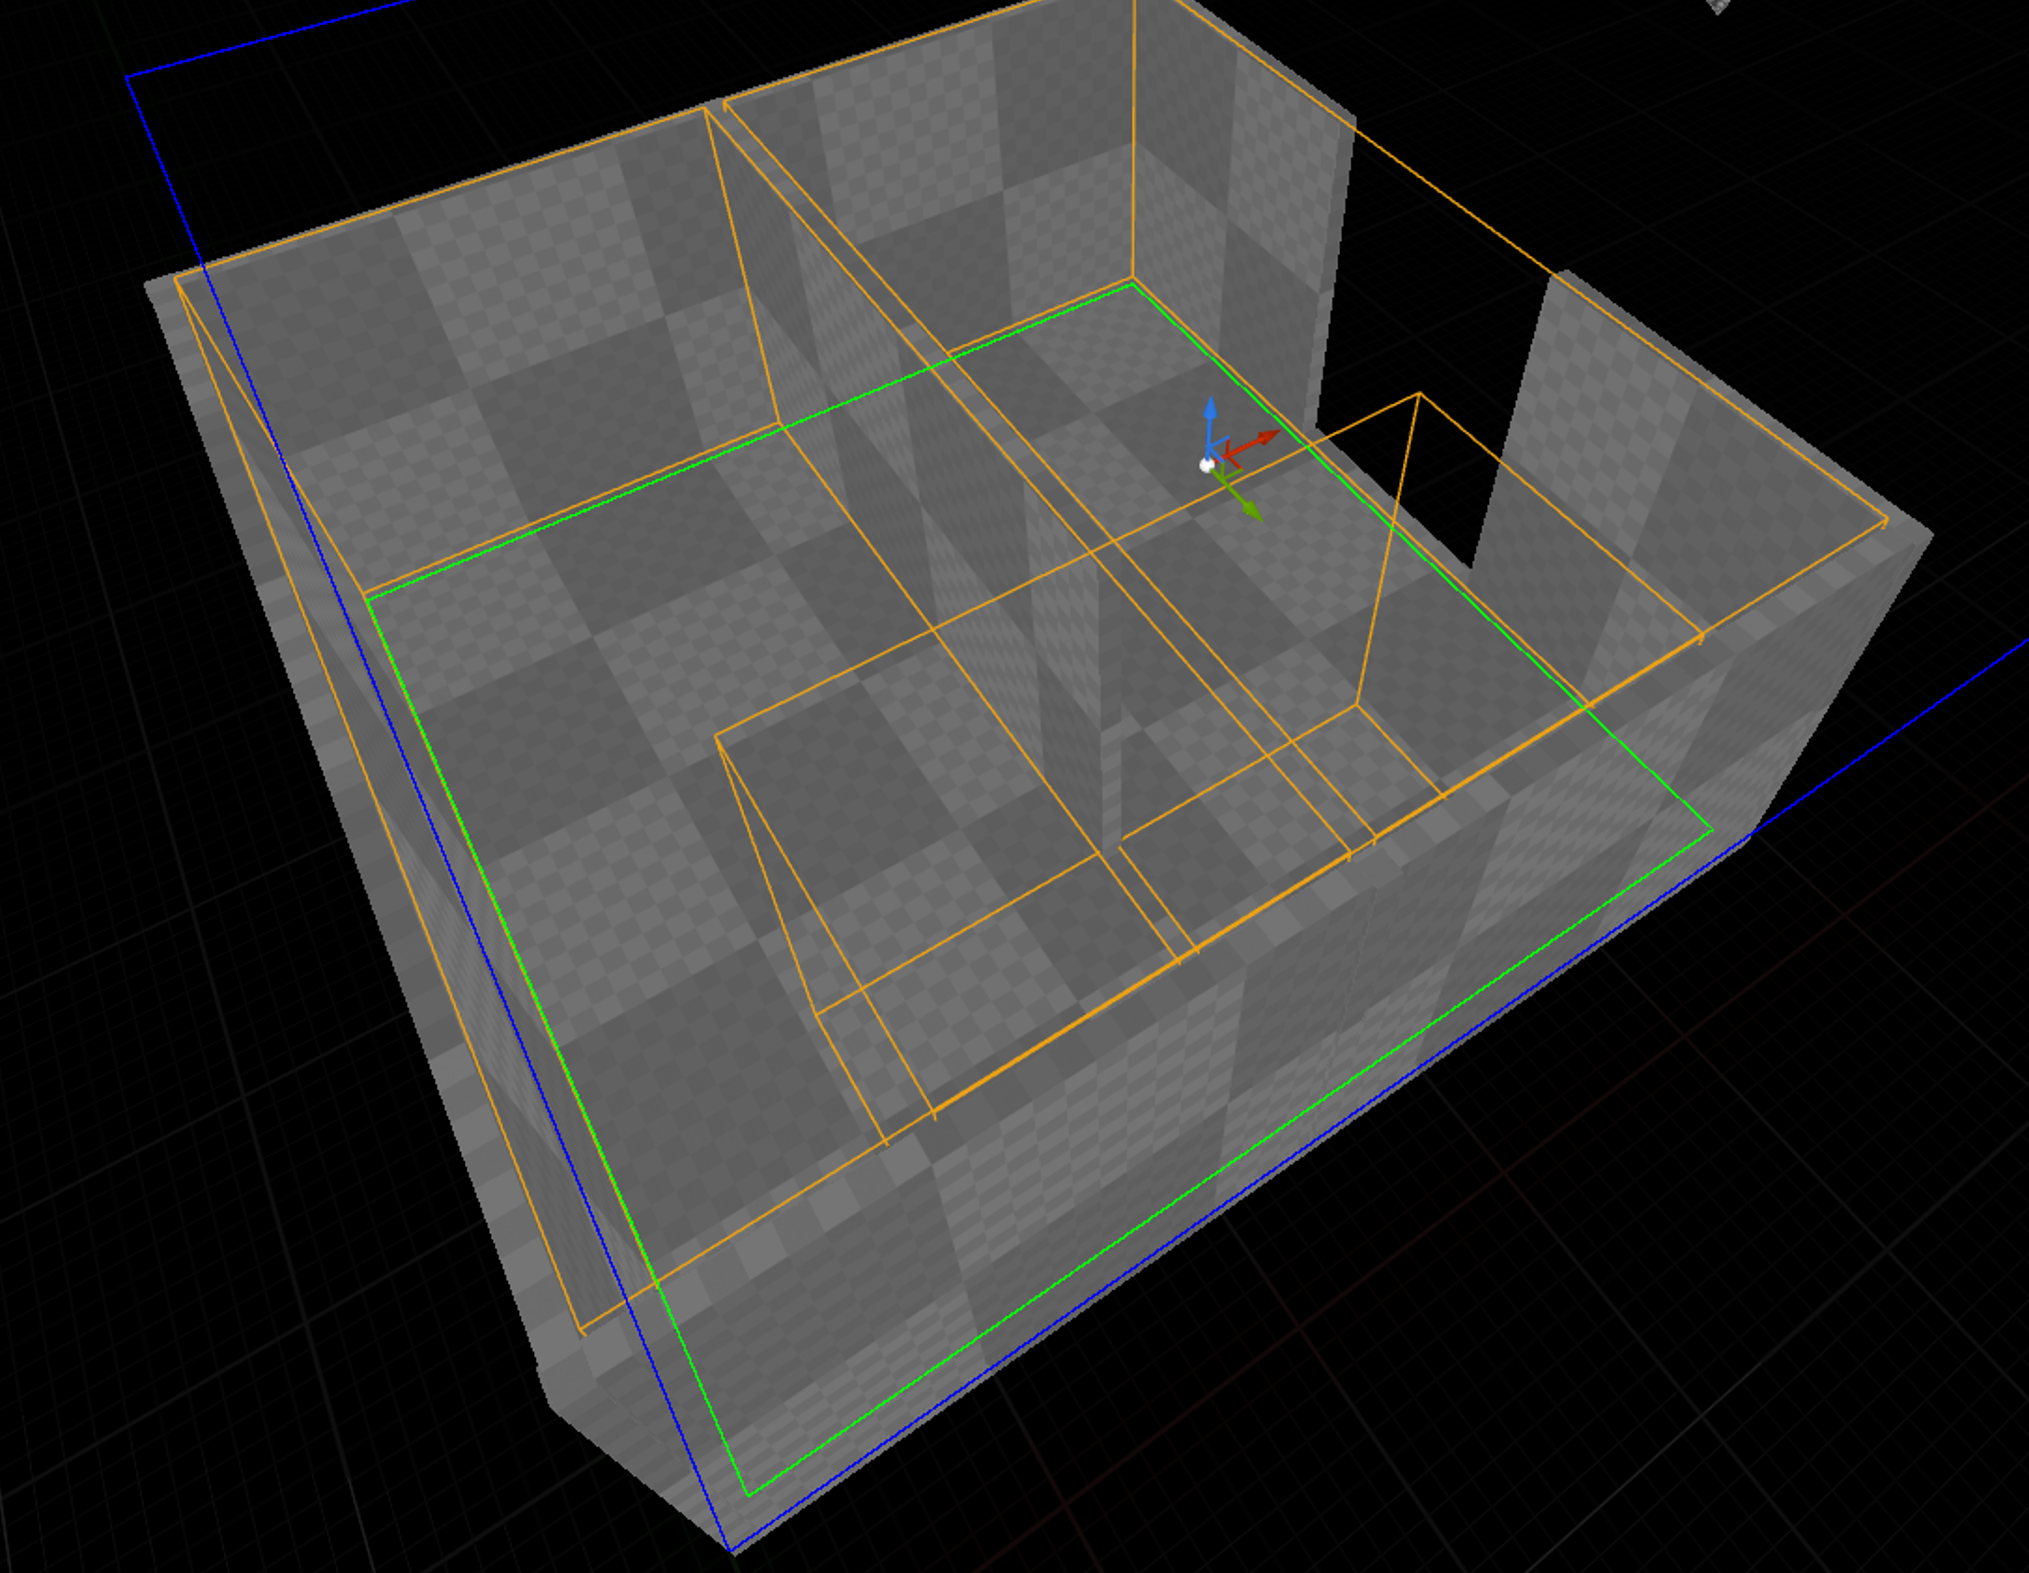
I'm going to duplicate the Zone Boundary Volume and align it to the second half of the room:
Note that the bounds of the Stage Zone automatically update to encompass both Zone Boundary Volumes.
-
I need one more Zone Boundary Volume to cover the door between these two rooms:
-
As the players will be entering a new Stage Zone when they go through the second door, I need one more thing: A Transition Volume. Transition Volumes bridge two Stage Zones. Add a Transition Volume to the level, attach it to the Tracking Origin, and position and size it so it overlaps the Zone Boundary Volume for the second room, and where the first Game Zone of the next Stage Zone will be.
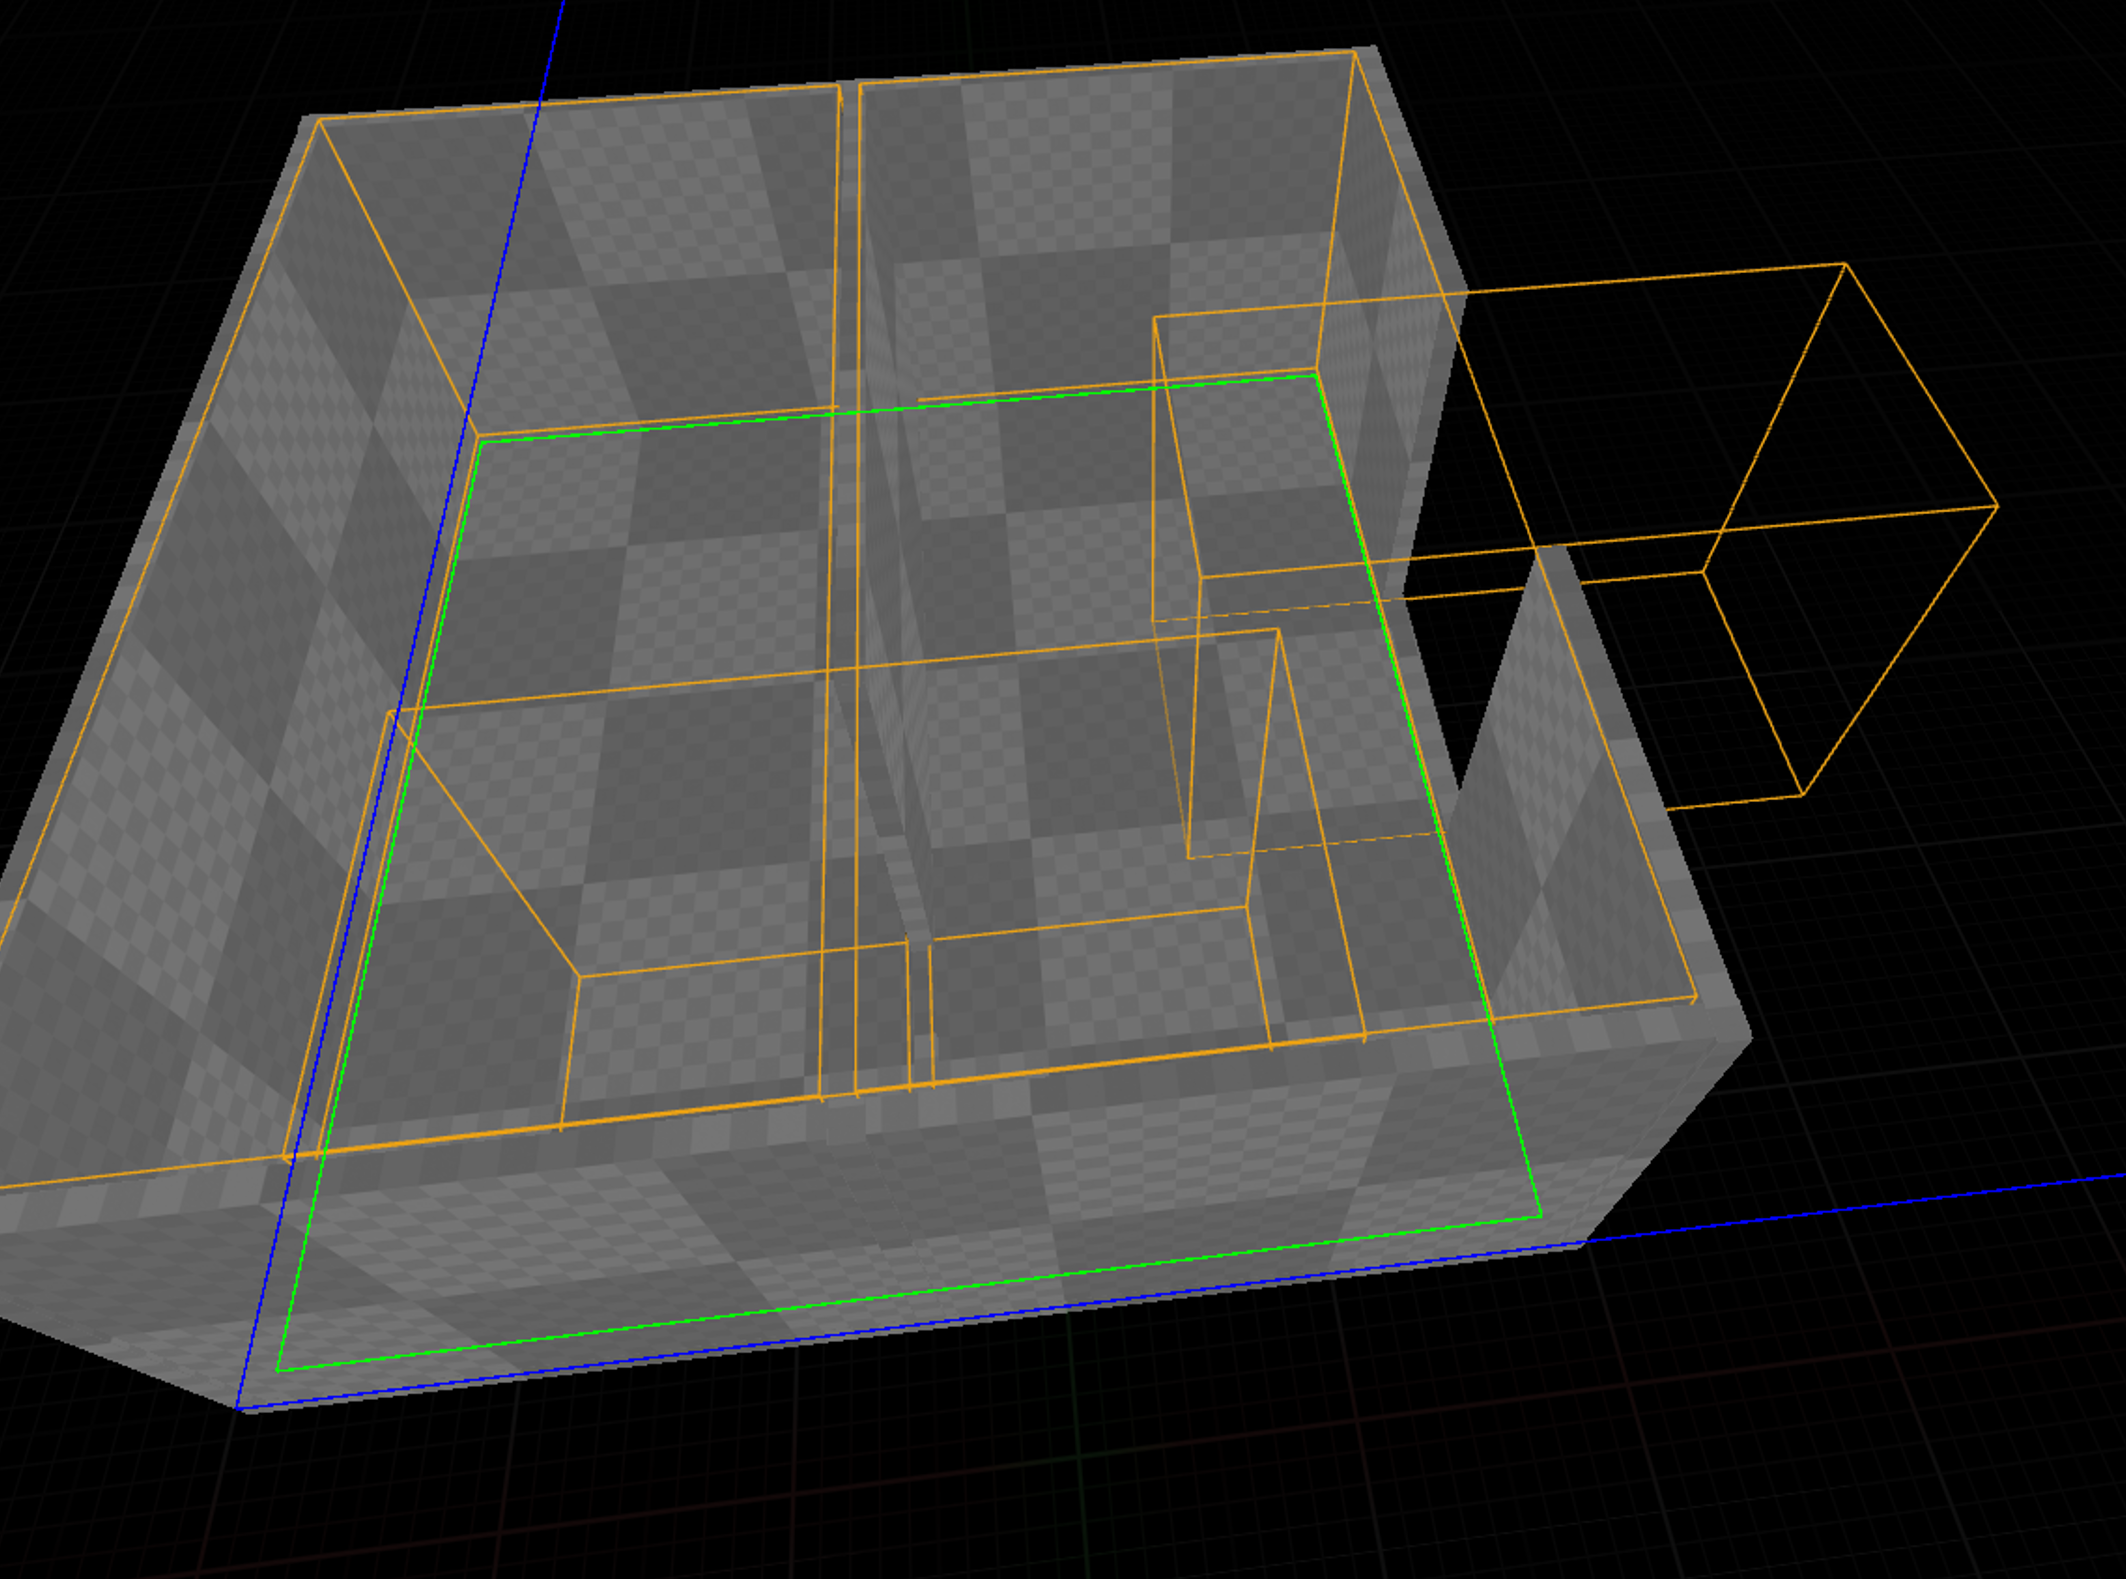
Note that the Stage Zone bounds do not update to encompass a Transition Volume.
-
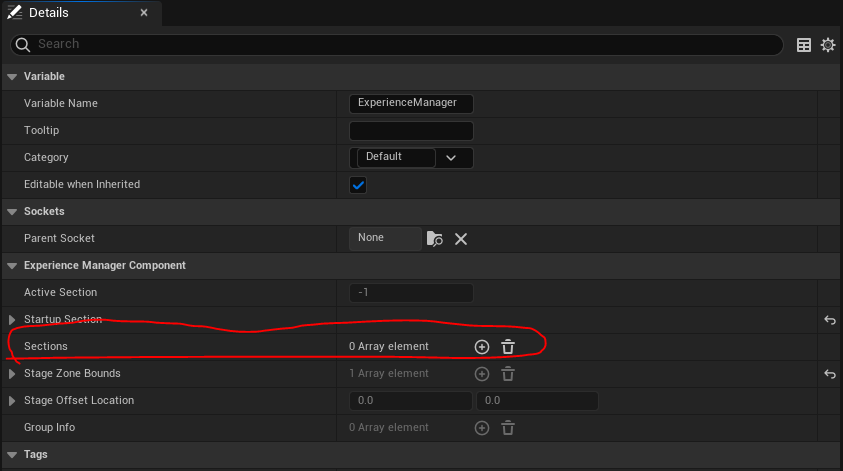
Now we have enough in-game to define our first Section in the Experience Manager Component we added to the Game State. Open your Game State Blueprint and select the Experience Manager Component. In the Details Panel you will see an array variable named 'Sections.'
 {width="555" height="310"}
 -
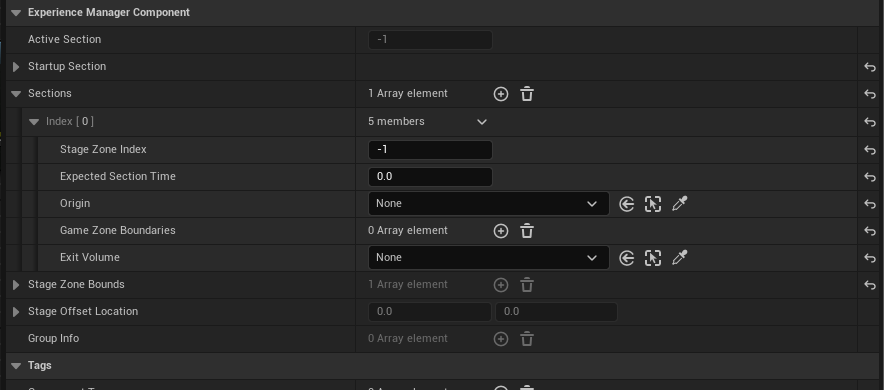
Click the + button to add an element to the array, and click the arrow on Index[0] to show the details of the element.
 {width="548" height="241"}
 -
Set the Stage Zone Index to 0 and the Origin to the Tracking Origin we already placed in the level. Set the Exit Volume to the Transition Volume we placed in the level. Expected Section Time is the amount of time, in minutes, you expect the players to spend in this section. This is important for GEM to manage when to allow additional groups to onboard.
-
For the Game Zone Boundaries array we want to add an entry for every Zone Boundary Volume in this Section. The ordering in the array determines the order that the Game Zones activate when Start Next Game Zone is called. For this reason it is probably a good idea to name your Zone Boundary Volumes so the order can be easily identified. I've renamed the ones I've already placed to Room_One, Room_Two, and DoorWay. Add the Zone Boundary Volumes to the Game Zone Boundary array. When you're done, the entry should look like this:

And that is the first Section of the experience defined.
-
You may have noticed that there is also a 'Startup Section' variable in the Experience Manager Component. Since suit-up and onboarding layouts are going to vary significantly from one venue to the another, it is impossible to include a layout for them in-engine. The Startup Section defines a non-specific 'Pre-Experience' area, and only requires a Tracking Origin and an Exit Volume. Ideally the Tracking Origin should be the same one that your first Section is using, and the Exit Volume can just be an Transition Volume placed anywhere in the world. Once all the members of a Group have joined the server and are all in the first Game Zone of the first Section, OnZoneStarted will fire, and you can start your experience.
-
Another thing that you might want to configure is the Timeouts on the Zone Boundary Volumes. In order to encourage players to move forward, Zone Boundary Volumes have Timeouts that, when they expire, disable the Zone Boundary Volume and any player that is in that volume will immediately become Out of Game Bounds (how you inform the player of this state is up to you. It should clearly indicate to the player that they aren't where they're supposed to be and also where the new safe zone is. Activating passthrough mode on the headset should be reserved for when the player is Out of Stage Zone Bounds). The timeout starts its countdown when the next Zone Boundary Volume in the list (or the Exit Volume, if we have reached the end of the Game Zone Boundaries list) is activated with a Start Next Game Zone call.
The flow of this example project would go something like the following:
Players suit up and are in the Client Startup Level->Once all players are suited up, the GEM Server will launch the Game Server and the Clients will query the GEM Server to find that Game Server and connect to it->Once all Clients have connected to the Game Server and have moved on to the Stage and are within the bounds of Room_One, OnZoneStarted will fire and some sort of scripted sequence or minigame will activate. Upon completion of the minigame or sequence, the experience will call StartNextGameZone->DoorWay will become active, allowing the players to begin to move into Room_Two, and Room_One will begin to time out->Shortly after activating DoorWay StartNextGameZone will be called again to activate Room_Two and start timing out DoorWay->Another scripted sequence or minigame will activate in Room_Two. Upon completion of the sequence or minigame StartNextGameZone will be called a third time. At this point, since we have reached the end of the Section, and the next Section will take place in a new Stage Zone, a call to the GEM Server will occur to determine whether the next Stage Zone is free.->If that call returns True, OnZoneOpened will fire, the door will open, the Transition Volume will become active, and Room_Two will start to time out.
Defining Dynamic Obstructions
Some locations may have obstructions inside the stage that pose a safety hazard to players. We can define the location of the obstruction in the UserGEMSettings.ini of a packaged server build.
- Package a Server build of your experience.
- Edit or create the UserGEMSettings.ini at [Platform]Server\[YourProjectName]\Saved\Config\[Platform]Server\UserGEMSettings.ini.
- Under
[/Script/WevrGEMLBEPlugin.GEMPluginSettings]add as many of the following line as are applicable:
Obstructions=(BoundsMin=(X=[The Minimum X Position of this obstruction, in centimeters],Y=[The Minimum Y Position of this obstruction, in centimeters]),BoundsMax=(X=[The Maximum X position of this obstruction, in centimeters],Y=[The Maximum Y position of this obstruction, in centimeters])).
- When you launch your experience, obstructions that fit the specified bounds will be spawned attached to all of the tracking origins in the experience.
Guidelines for the pre-experience Tutorial
Note:
The following is an example implementation of a tutorial. Developers are encouraged to customize or expand on this approach to best support their experience design..
Since a Location Based Experience is likely to be most players' first experience with VR, it may be necessary to include a post-startup but pre-experience Tutorial that explains any interactions in the experience, what virtual boundaries in the experience look like, and what any handhold guidance (i.e. footprints, particle trails) that players are meant to follow look like. Here are some requirements and guidelines for the tutorial:
Requirements:
- The Tutorial must wait until the OnReceivedStartTutorial event is received before it can be triggered.
- When the Tutorial is complete, or when it is ready to signal the players to move into the first zone of the experience proper, it must call SetTutorialComplete with True.
- Passthrough should not be disabled until the Tutorial is complete.
Guidelines:
- The tutorial should demonstrate what the chaperone bounds look like.
- The tutorial should demonstrate what an Obstruction looks like.
- The tutorial should demonstrate what a Ghost looks like, and explain that players should maintain a safe distance from any Ghosts they see.
- If the experience has any interactive elements, the tutorial should explain any indicators for interactive elements, and how to interact with them.
- If the experience has any guiding UX, the tutorial should explain what it looks like.