Testing Your Unreal Project
Ideally, for testing, you should test packaged builds against a GEM Server, in which case you should package your builds and follow the GEM Setup instructions. (Please see the Unreal Engine documentation for instructions on how to configure your project to build Dedicated Server and Client targets.) However, we understand that packaging builds and testing against GEM can be very time-consuming and thus can have a significant impact on project iteration time. To help with that, the GEM Plugin for Unreal is designed so that when any Online Subsystem other than GEM is set as the default, the GEM functions and events will still fire as though being run against a GEM Server that is only managing one active group. There are, however, a couple of simple extra steps to run in this mode.
Setup
- Edit your DefaultEngine.ini and set the OnlineSubsystem DefaultPlatformServer to NULL (or any non-GEM Online Subsystem)
- Recommended: Configure your Game Mode so that there is no default Player Pawn class, and in your Player Controller class, set it up so that it will spawn and possess either a VR or non-VR pawn depending on whether an HMD is actively being used. This way you can test without VR, which can be useful to test multiplayer functionality.
Launching for Testing
Command Line
You can test with a Dedicated Server and Windows Client by launching your project from command line with the -server and -game command line arguments. The server will also need the -GemGroupId and -GemGroupSize command line arguments to work properly.
Server Command Line Example: [Path To Your Unreal Installation]/Engine/Binaries/Win64/UnrealEditor.exe [Path To Your Unreal Project]/YourProject.uproject -server -log -GemGroupId=1 -GemGroupSize=1 This will launch a dedicated server with a group size of 1.
Client Command Line Example: [Path To Your Unreal Installation]/Engine/Binaries/Win64/UnrealEditor.exe [Path To Your Unreal Project]/YourProject.uproject -game -log -nohmd -windowed -resx=1920 -resy=1080 This will launch the client in non-VR mode with a window size of 1920x1080.
PIE
You can also test in-editor with PIE. Launching in PIE in with the Netmode set to Play Standalone should just work (unless there are any explicit Dedicated Server checks in the experience code). But you may still want to test against a dedicated server in PIE. To do this select 'Play as Client' from the NetMode Selector:
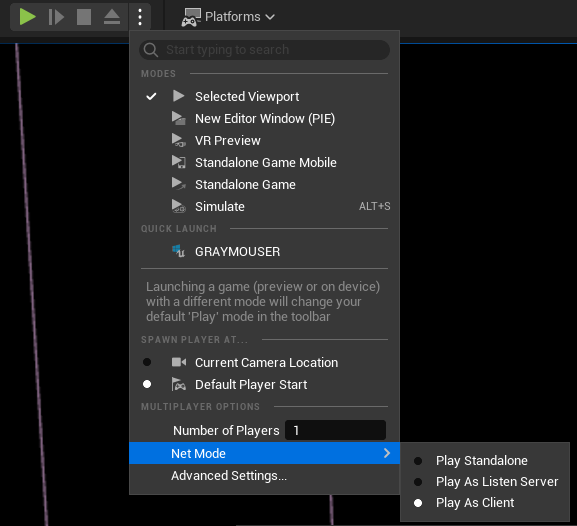
And in Advanced Settings enable 'Launch Separate Server' and disable 'Run Under One Process' (some memory pointers get mixed up when Run Under One Process is enabled, which can cause crashes).

Then hit the Play button, and you should be good to go.
Additional Notes:
When setting the Number of Players greater than 1, it may be necessary to add '-nohmd' to the 'Additional Command Line Parameters' field of Play Standalone section in Advanced Settings.
The initial OnZoneOpened event may not fire once all players have joined. OnZoneStarted will still fire for the first zone once all players have entered the zone.