Introduction
The GEM simulator allows the user to simulate end-users, devices, and attendants, while allowing the GEM platform to operate ignorant of the fact that those are being simulated and not real devices, attendants and end-users. This makes it very useful for various forms of testing of the GEM server.
The GEM simulator is actually composed of two components. The gameSim and the showSim.
The gameSim is a go App which simulates an experience (both clients and server). Generally the simulator user is not required to interact with the gameSim in any way. Just as the GEM server launches experiences when it needs to and the attendants don't have to do anything in that regard, so the GEM server launches the gameSim when it needs to and the simulator user does not have to do anything in that regard. The only time the simulator user needs to understand a bit about the gameSim is when they wish to define simulated shows using their own timing and layout parameters.
The showSim is a python App which simulates the movement and behavior of end-users at a show, the actions of the attendants operating the show, and the actions of the simulated devices that are assigned to the simulated end-users by the simulated attendants.
The showSim is intentionally provided as a python file so that simulator users can quickly and easily make modifications to its setup and logic should they wish to.
Setting up to run the simulator
The simulator comes with a predefined site definition, as well as some predefined shows. This allows you to run the simulator right away quite easily. These definitions can coexist with any site, testing or production, so you do not have to worry about loading them into your existing database.
First install the simulated experience.
gem admin db loadapp gameSim --apply
Next, define a simulated location. You will have to stop any showrunners to do this. The simulator defines a lot of devices, so that step may take a bit of time. The yaml files are in the scripts folder provided in the GEM distribution. You do not have to be in any particular directory when you load them, and you do not have to execute these commands in any particular order.
gem admin db load simDB_site.yaml --apply
gem admin db load simDB_devices.yaml --apply
Now you are ready to run one of the predefined simulated shows.
Running the simulator
One of the predefined simulator shows is called "LoopWithMulti". It defines a show that behaves like the Emperor Project. A stage of 7 zones, with one of them being double sized. The experience loops around twice and permits two groups to be in the larger zone at one time.
Let's run that. First start the showrunner for it.
gem-server showrunner LoopWithMulti
The simulator can run on any machine on the network. It does not need to be on the same machine and if you are doing performance analysis, you may want to run it on a separate machine. That machine does not need to have GEM installed on it. The only pre-requisite is a relatively recent version (e.g. 3.11 or higher) of python.
python showSim.py LoopWithMulti -siterunnerIP <ip of siterunner>
Note that when running the simulator, you have to provide the IP of the siterunner, even if it is running on the same machine. You may not use "localhost". You must use the IP address that the siterunner reported to the console output when you started it.
The simulator displays in the console window where you started it. You should resize that window so that you can see all the sections of output correcty. The simulator currently display 5 separate sections:
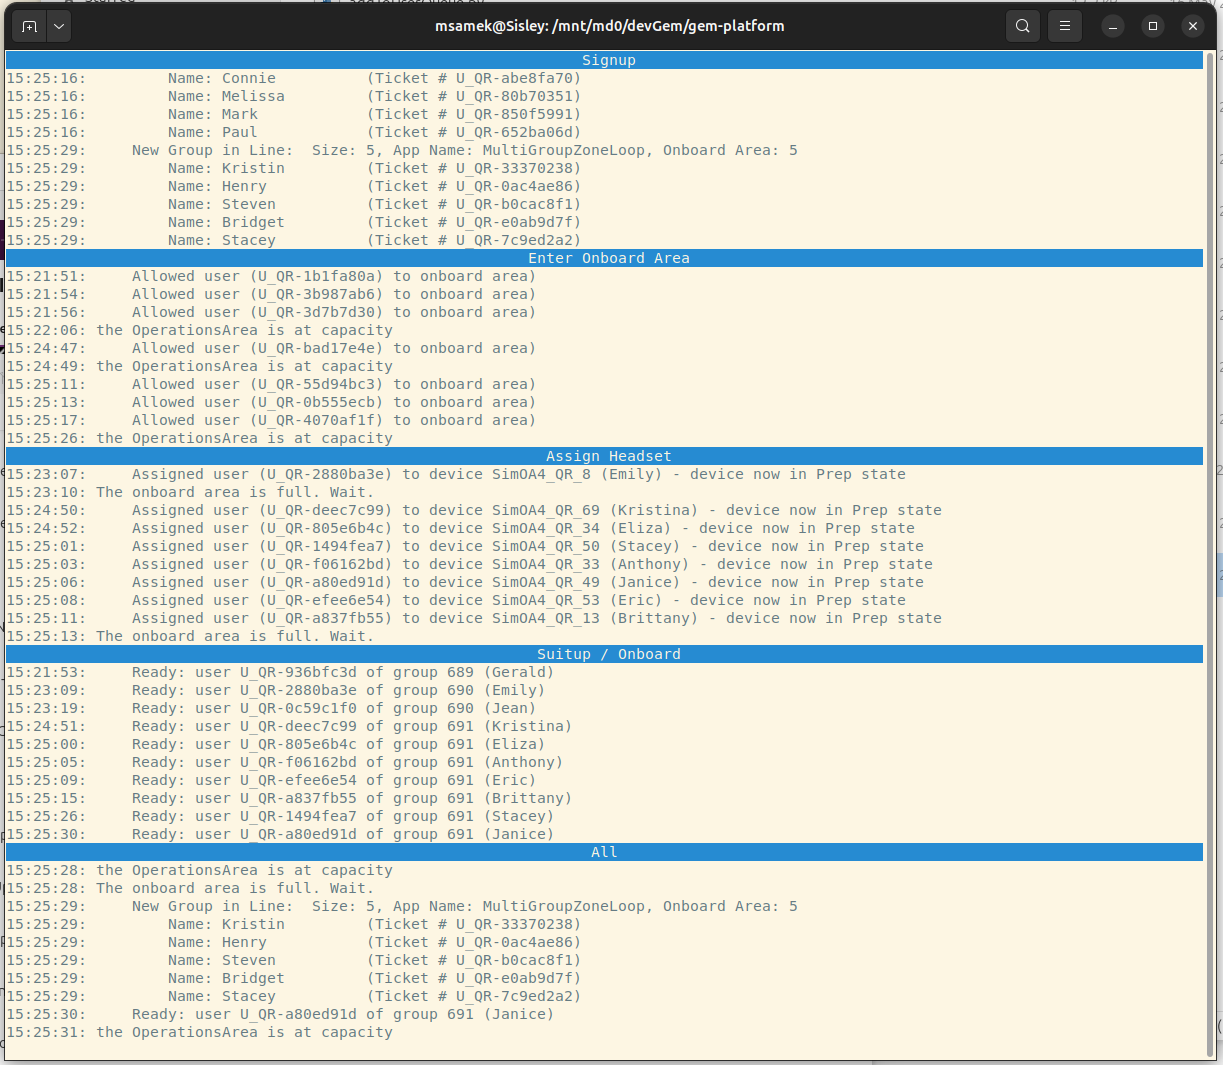
The simulator simulates different parts of the user/attendant flow as separate threads. The outputs of the main ones are in each of the section.
The top section, labeled Signup has the output of the simulation of users who have arrived at the site signing up at the location. They are arrive in subgroups of various sizes and a gem user record is created for them as if they had used the Signup App to signup up as a Team. By default, there is no limit. People will continue signing up indefinitely as long as you run the simulator. You can, however, control the rate at which they sign up. More about that later.
The second section, labeled "Enter Onboard Area" has the simulation of users who have already signed up actually arriving at the experience and aking to get it by getting their QR code scanned. This is equivalent to the "Queue" button on the dashboard, or the "Let user in" button on the mobile dashboard. If the area does not have room for the entire subgroup, you will see a message that the OperationsArea is at capacity and the group will have to wait until room frees up. The users from a particular subgroup do not enter in the same order as they signed up and they don't all arrive exactly at the same time, in order to make sure the simulator is not always testing the ideal scenario. You can control the rate at which groups approach the onboard area to be let in, and you can control the rate at which they are scanned by the operator. More about that later. The simulatopr site definition has the capacity of your onboard area, which you can modify, and periodically you will see that the onboard area is full and the simulated attendant is waiting to allow people into the onboard area.
The third section, "Assign Headset" is the output of the simulation of an attendant assigning headsets to the users in the onboard area. If there are no users in the onboard area to assign headsets to you will see a message to that effect. Likewise, if there are no headsets available to assign to users you will also see a message to that effect and this section will wait until headsets become available. The simulated show definitions have just enough headsets defined for a full show (i.e. stage is full of 8 person groups) and all onboard slots are full. Because groups sizes are random, like in real life, it is rare to run out of headsets. However, the simulator has a spearate thread that represents an attendant cleaning and preparing headsets for the next group. If this "device processing" thread is defined to be too slow, then you will see the onboard area periodically having to wait for headsets to be processed as users exit the show.
The fourth section, "Suitup / Onboard" area indicates what is happening in the onboard slot. Users should be putting on their devices to get out of the suitup state and into the onboard state.
Finally the fifth section, "All" shows all messages, even from those threads that were not mentioned in the primary sections above, shown in chronological order. Because the simulation represents different people at different speeds, the chronology of the messages in the All section can sometimes seem unintuitive.
You can let the simulator run indefinitely. When doing soak tests (to see if there is memory growth or CPU degradation over time) we have let it run for days and weeks.
You can also use the CLI to change settings, or the showrunners process manager to kill gameSim processes and see how the simulator will react. You can restart GEM server, or bring them down for longer periods of time to see if the simulated show recovers.
Modifying simulator timing
In the showSim.py file, near the top is an array called "CONFIGURATION_SETS". A configuration set controls various attribute of the simulation. If you have common scenarios that you run you can create your own named configurations set and then tell the simulator to use that with the -config command line options.
There are two ways two define a configurations set. One is to list all the variables (in the showSim.py file you will see the "default" and "debug" configuration sets defined this way. Or you can inherit from another configuration set and just override some variables. You can see the "nosignup" configuration set configured this way.
Modifying simulated show timing
You will notice that the configuration sets inside the showSim.py file allow you to modify the attributes of the simulation (i.e. the users and the attendants), but not th attributes of the experience itself (e.g. how long it lasts and how many zones it is).
In real experiences, these definitions come from the gem_manifest file that comes with an experience from the developer/publisher of the experience. The gameSim experience used by the simulator is no different. If you look in the gameSim folder that came with the GEM distribution you will see that there is a manifest file in there.
If you look at that gem_manifest file you will see that it is a bit longer than the gem_manifest files that come with the production experiences. That is because the gameSim actually defines several different experiences in the same gem_manifest file. This is a standard feature of gem_manifest files, the ability to define multiple experiences in the same manifest, but the current experiences in development do not use that feature.
In the case of the gameSim, it defines 4 separate apps:
- GemSimGame8Server
- GemSimGame8LoopServer
- GemSimGame2Server
- MultiGroupZoneLoop
Each of these apps differs by how many zones they have, whether the show loops among the zones, how long (in seconds) each zone takes, etc.
You will notice that in the gameSim manifest, all of those different app definition use the same executable for the server and just pass different parameters to it. That is the crux to understanding how you can customize the pre-existing simulated experience definitions or define entirely new ones.
For example, from the manifest, here are the arguments to the MuliGroupZoneLoop app definition which is used by the LoopWithMulti show that we used as an example above:
       process_name: "gameSim-linux"
        args:
          - "[[0,45],[1,45],[2,90],[3,45],[4,45],[5,45],[6,45],[0,45],[1,45],[2,90],[3,45],[4,45],[5,45],[6,45]]"
          - "MultiGroupZoneLoop"
          - "0.0.1"
The array of tuples under args represents the zone sequence. The first number of each touple is the stage zone number, and the second number is how long the experience in that zone lasts. In this example, you will see that there are seven zones (0 to 6) and the sequence loops through those zones twice. All of the zones are defined to take 45 seconds, except for zone 2 which is defined to take 90 seconds.
If you wish to modify the timing of the show, for instance to try to simulate real show timings, all you have to do is change the second number in those touples to be more representitive of a real experience and rerun the "gem admin db loadapp" command on the gameSim.
Setting up your own simulated show
If you look at the simDB_site.yaml files that you loaded above, you will see that there is a show definition just like you have for real shows. You can change those parameters (e.g. the number of onboard areas) to more accurately specify the scenario you wish to simulate.